MISSION 3
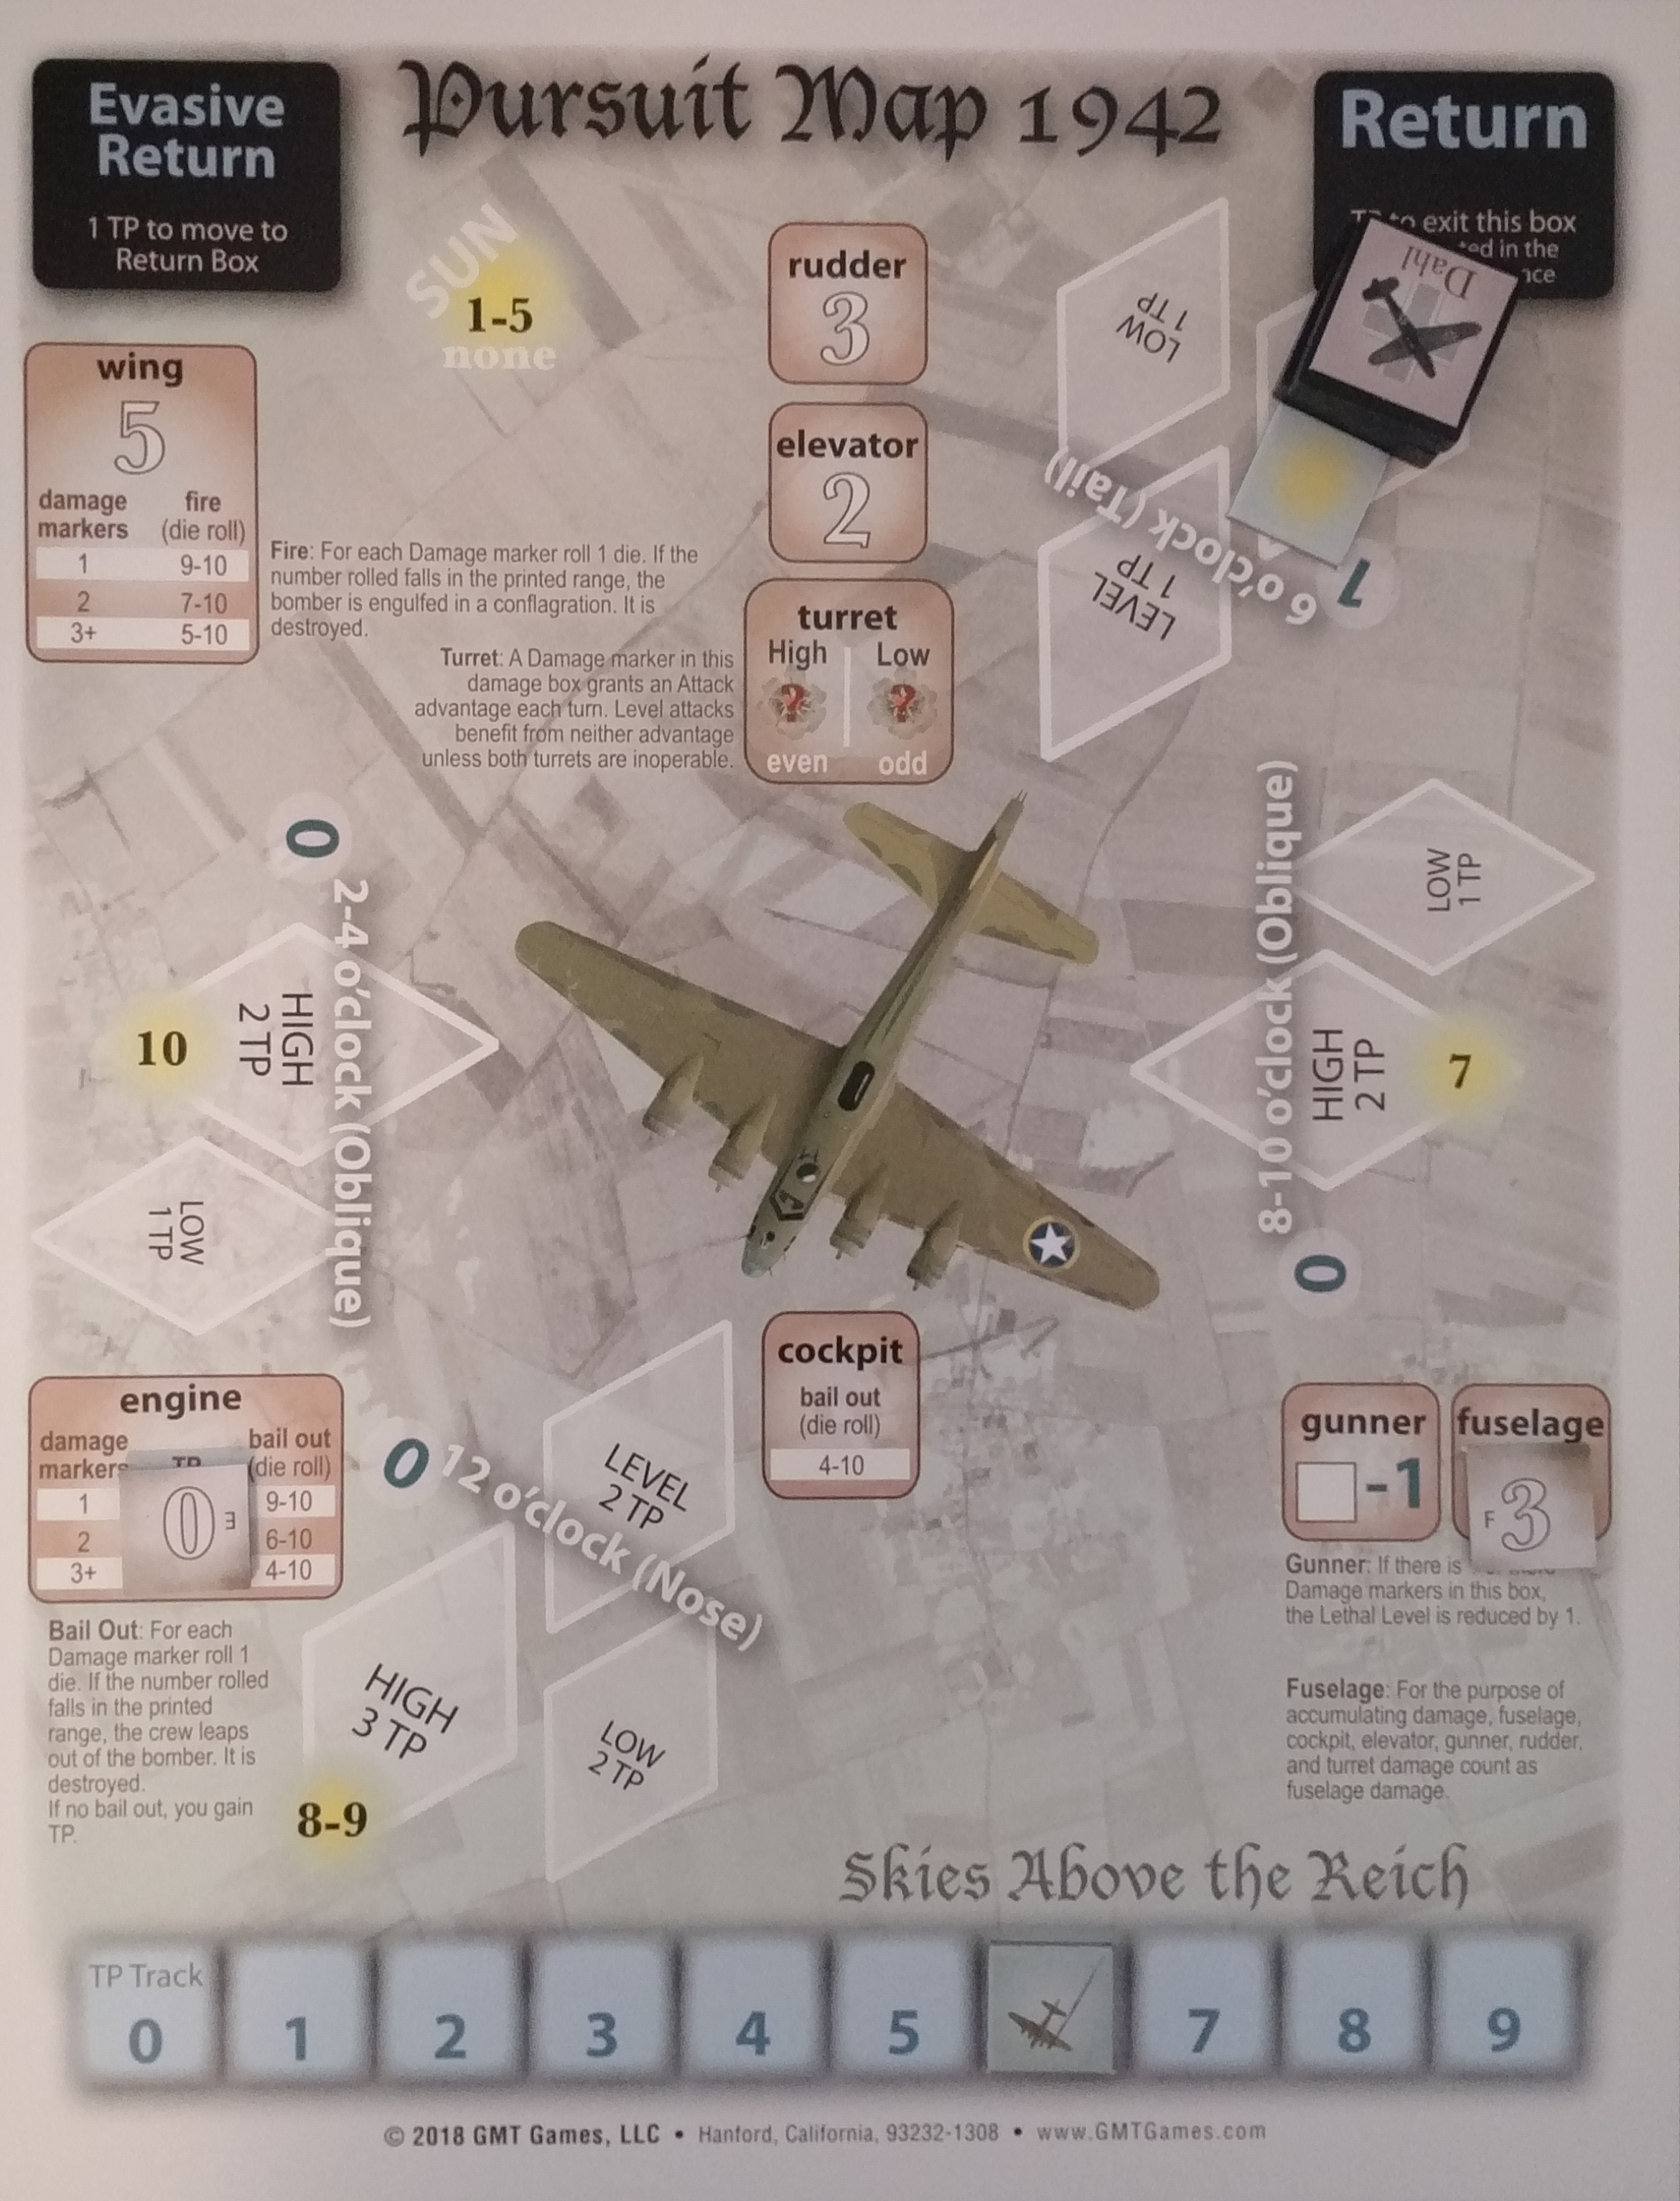
I will preface this by saying I intended to use this mission as a showcase for the advanced rules, which mainly govern the Pursuit phase which takes place at the end of a mission and deals with the fates of bombers which have fallen out of the formation during normal play. I hope it won’t be too much of a spoiler to say that it, uh, never came up. Maybe next time. For a visual aid, please refer to the first image in the thread, since I didn’t take any pictures this time. Whereas that mission was against “Formation B” on Map 1, this one is against “Formation A” on the same map.
Following the previous mission, the mood in the staffel was cautiously optimistic. When the alarm was raised and the eight pilots chosen for the mission made contact with the formation and saw that they would only have to deal with a single, isolated element, they were filled with Grimm Determination, by which I mean they were determined to repeat Grimm’s victory from the last mission and even build on it.
The formation was intercepted on its way to the target, meaning they hadn’t yet had the chance to drop their bombs and thus headquarters would look twice as favorably on their elimination as otherwise. Their (light) escort was with them from the beginning and would not abandon their charges, even unto the bitter end. Very well, the Spitfires had proven no deterrent last time, so there was no reason to suspect they would make things any more difficult this time around. The sun was in the rear of the formation, and by the time interception was accomplished the fighters had enough fuel for about six, uh…turns.
Turn 1
Auerbach and Bachmann, the Green replacements for dear departed Ademeit and Bauer (both lost, you will recall, to a fatal midair collision in Mission 1), swung around to the Nose, while Dahl, Frieling, Grimm and Heller (my three active experte, since Clade remains stuck in the infirmary, along with one previously-unused veteran) elected to come from the Tail of the formation, with Johann and Kremler moving in from the Left Flank and Right Flank respectively. A classic double pincer move, or anyway that was the intention. As per the rules, all entered in the Low box of their respective board sides.
During the Escort phase, one Forward escort moved to the Above Trailing station, and one Below Trailing escort moved to Tail Low, smack on top of my big stack of four fighters. This triggered aerial combat, which entails flipping over the escort marker to reveal how many fighters there are. In this case, four, so my four BF109s tangled with an equal number of Spits. Since the escorts moved from Below Trailing, my fighters were automatically “higher” than them, and since there was an equal number of both, my fighters did not outnumber, so rolling and cross referencing on the aerial combat table resulted in 1 escort downed (assigned, randomly, to Dahl, who now has two experience points after getting one for bailing out last mission) but also, somewhat catastrophically, in the remaining fighters and escorts exiting, “exit” being the term of art in SatR for being out of play, removed from game, etc. Nobody’s dead, but they are no longer participating in this mission because by the time they finished playing around with the escorts, the formation was out of sight.
So that’s half my force gone, on Turn 1.
Turn 2
Undeterred by the faithlessness of their comrades, Auerbach and Bachmann move to the Nose Low Approach box to begin their attack runs, with Johann likewise moving to Left Flank Low Approach and Kremler to Right Flank Low Approach. The pincer is now smaller, but will nevertheless proceed! The escorts do a little bit of shuffling from station to station but don’t bounce my fighters again.
All the fighters move in to attack the “trailing” bomber of the element, the bottom one which was (very slightly) damaged in the lead up to the mission and which I have chosen to label (going from the top down) “Bomber 4” in the misguided assumption that more than one bomber would be attacked in this mission. So Auerbach and Bachmann go to the “front” space, with the others approaching from either side. Three of the four pilots choose Determined as their mode (although Auerbach doesn’t have a choice, since his Green penalty is Zeal, which forces Determined; no evasion for this scion of the Fatherland!), but Kremler goes Evasive, since his approach from the right flank will put him in a Lethal Level 2 spot.
Since both Auerbach and Bachmann are in the same space, this triggers a collision check, which given the outcome the only other time i have done this makes my heart beat a bit faster, but I pull an “E 1TP” chit, which means I can either pay 1TP to have the fighter to whom I give the chit (my choice) go immediately to either Tail Return box or the fighter instead exits. Bachmann, as a Greenie, has the “Erratic” penalty, which means during the Break Away sub-phase of the Attack phase I have to pay 1TP or have him exit, and since I only rolled 2TP for this mission, I seriously consider having him exit now, but having already lost half my force to escort shenanigans, I want to at least get a burst out of him, so I send him to the high Tail Return box. Since he was Determined, the chit stays on the formation for purposes of Cohesion checks later on. For maneuvers, Auerbach roll climbs toward the Tail, Johann roll dives toward the Tail and Kremler dives toward the Left Flank (I am here hoping to set up a Position Advantage, which requires two different fighters to approach the same element from different positions and elevations, although the timing is not going to work out, since I forgot to take the “turn penalty” for Evasive into consideration).
Auerbach scores a minor hit to the bomber on his pass (1 dmg to fuselage), gets hit in turn (Cockpit 6), and the card triggers a collision check, which results in No Impact; pass through 1). Johann doesn’t hit or get hit but also triggers a (No Impact) collision check with pass through 1. Kremler simply gets pass through 1. During continuing fire, the only thing of note that happens is that Auerbach pulls the Friendly Fire text which results in a 1 dmg hit to the bomber’s wing from one of its buddies. Thanks, American gunner!
Turn 3
Bachmann and Johann return to Tail High and Kremler returns from Evasive Return to Regular Old Return on the Left Flank, spending that extra turn to come around for another pass that Evasive gets you. Meanwhile the escorts shuffle a bit more in their stations outside the formation and Auerbach decides that the hit to his cockpit was trivial, since it doesn’t appear to have punctured any vital machinery, including himself.
Turn 4
Bachmann and Johann move to Tail Approach High while Auerbach returns to Left Flank High and Kremler returns to Left Flank Low. Bachmann and Johann attack Bomber 4 from the rear, earning themselves the Out of the Sun advantage in the process, which enables avoidance of a hit. Both go in Determined. Since they’re in the same spot, I have to draw a collision check chit, which turns out to be a Proximity 2. Readers with a strong memory (or a strong facility with the scroll bar) will recall that it was just such a chit that I pulled way back in Mission 1 when I lost Ademeit and Bauer. They may also recall that if you roll at or above the number (2) on the chit, then no collision occurs. They may recall that I rolled a 1, then next rolled odd, meaning instead of colliding with the bomber, my fighter collided with another fighter, destroying them both. Well, surely that can’t are you kidding me, I rolled another 1, then odd. Bachmann and Johann go down in flames.
Oh. My. God.
Turn 5
Having witnessed the colossally unlucky loss of their buddies and feeling the hot breath of Time on their necks, since the mission clock is ticking down and nothing has as yet been accomplished, Auerbach and Kremler move in for the kill, to Left Flank Approach High and Left Flank Approach Low, respectively. The escorts continue to move around to little effect, with one going to the Tail High Return box this turn. The element fails its cohesion check (which I have been making each turn, but not commenting on when it changes nothing) and goes to Element Loose, lowering the Lethal Level by 1 in all spaces. Both fighters go in Determined.
Auerbach and Kremler both move to the Left Flank space of Bomber 4. Yes, I am once again tempting the extremely vindictive fate who controls collision checks. I draw an “E 2TP” chit, meaning pay 2TP or a fighter exits, and since I only have 1TP left I can’t pay, so Kremler exits the scene, offering Auerbach luck as he goes.
All alone in the world, Auerbach presses the attack, scoring a hit on the bomber (engine…0 dmg, ugh) and taking a hit in return (Rudder 7). He moves off to the high Return box on the Right Flank.
Turn 6
This turn marks the Flight Limit, but as Auerbach is the only fighter left on the board, the mission will immediately end if he leaves play anyway, which since he fails his Recovery check (meaning the rudder hit was serious) happens, as he shuffles off to the Rudder fate box.
FATE
The rudder hit is one of the more survivable ones, thankfully. A roll of 7 or higher means the pilot lands successfully. Unfortunately for Auerbach, I roll a 6, which means although he valiantly struggles to keep the aircraft’s nose pointed in the correct direction, he crashes. Not to worry, because most of the outcomes from a crash result in bailing out, almost all in fact, with about half of those resulting in the pilot being wounded. It’s only on a 1 that he fails to bail out. Of course I roll a 1 and he dies.
Post-Mission Analysis
Well, in the Notes field on the Staffel Log for Mission 1 I wrote “total disaster,” but I only lost two pilots on that mission, so since I lost three this time (two of which were replacement pilots and will thus not be, themselves, replaced) it seems appropriate to annotate this one as an “incredible disaster”. Although it is, of course, not the staffelkapitan’s fault, really, that his pilots can’t seem to stay in the air, it seems rather unlikely that headquarters will take such an expansive view of the situation, so this seems likely to be my only season in charge of this particular group. A rumor has been going around the barracks that our staffel is cursed, or maybe just that I am cursed, and I find it difficult to disagree.