The mood in the staffel was grim following the last mission. Two pilots dead, one wounded, and the next mission sure to be tougher. A few days later the mission was handed down, and sure enough it would make the first one, on paper at least, look like a milk run:
Map: 2 (a full-bore combat box this time, no more fooling about with lesser formations)
Mission Type: Outbound (Again! Ugh. Outbound missions tradeoff a little operation security at the beginning of the mission for less chance of scoring, because [again, in the basic game] fallen out or destroyed bombers are worth 2 VPs on an Inbound mission, but only 1 on Outbound or Near Target missions. Near Target, I suppose, forces the bombers to contend with flak in addition to your own ministrations)
Operations Points: 6 (I erroneously thought I had to subtract 3 OPs from this, although a post-mission reading of the rulebook revealed that your own fighters don’t count toward negative OPs when lost, only auxiliary fighters; so I unnecessarily handicapped myself by only fielding three fighters this mission)
Escort: L5S (light escort [5 planes], showing up on turn 5, Spitfires)
Clade remained unfit to fly, so Dahl, Frieling and Grimm were tapped to take on the mission. Upon arriving at the formation, the situation was as follows:
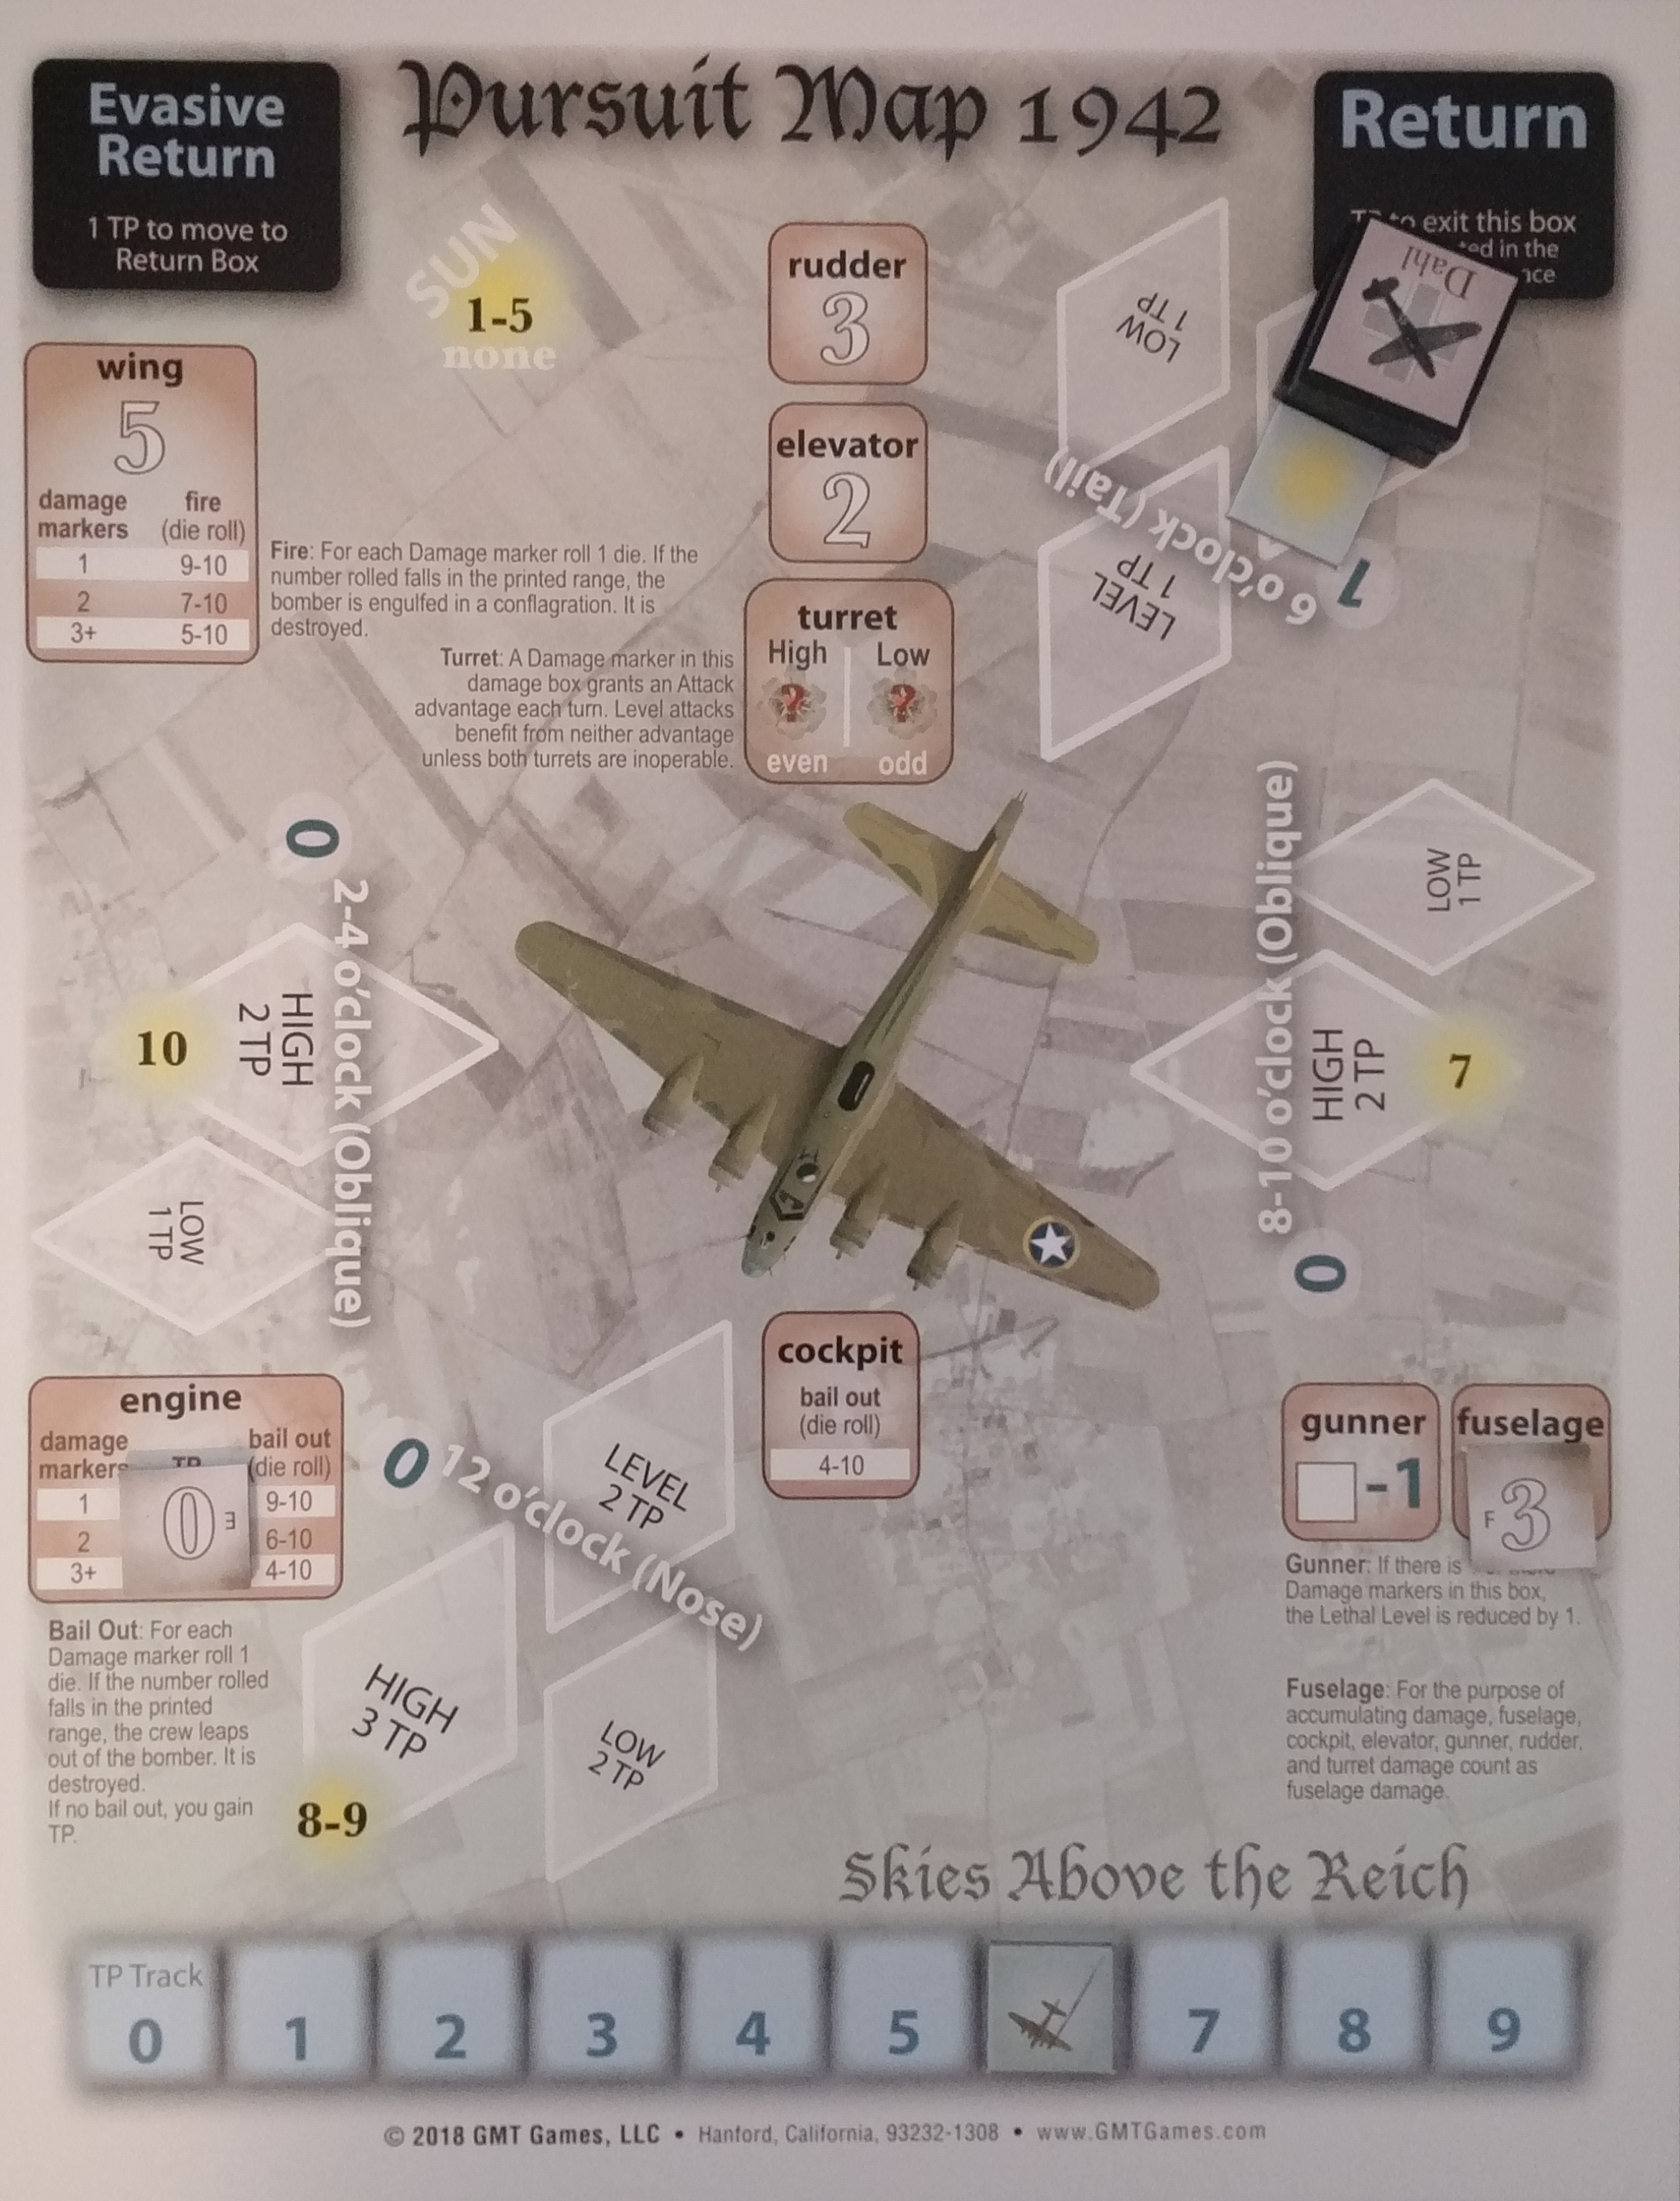
Damage: Three markers, all 1-point fuselage hits, got put down on separate bombers.
Anchored: Level & Low 8-10 (“Left” from here on) Flank. This is new for me this mission. Anchoring is intended to represent off-map elements of the formation assisting with the defense of elements shown on the map, presumably by filling the sky with so much lead the fighters are prevented from using those avenues of approach, because having an Anchored token in that box means your fighters cannot enter it.
Sun: None. Must have been an overcast day.
Tactical Points: 6
Flight Limit: 9 turns. The variable flight limit is intended to simulate conditions your fighters had to undergo to reach the formation. Maybe they had trouble getting into position, used more fuel, etc. Who knows. The thing is, this is the number of turns they can stay on station before having to turn for home.
Turn 1
Dahl enters the map on 2-4 (“Right”) Flank Low. Frieling enters Tail Low. Grimm enters Nose Low. As a reminder, all fighters always enter Low. First turn, all the can do is enter and size things up. This map has a few new features compared to the last one. Some of the spots, for one thing, are Lethal Level 4. Some get a +1 bonus to LL if their corresponding map side has any Anchored spots, which means I won’t be doing too many attacks from the Left Flank. Some get a +1 LL bonus if you approach from a certain altitude, e.g. Low. Lot to take in.
Turn 2
Might as well get on with the job of knocking down some bombers. Dahl moves Oblique Low Approach. Frieling moves Tail Low Approach, Grimm moves Nose Low Approach, and in the Attack phase they get moved onto the map like so (picture’s a bit fuzzy; this time I used my phone rather than my Fancy Camera):
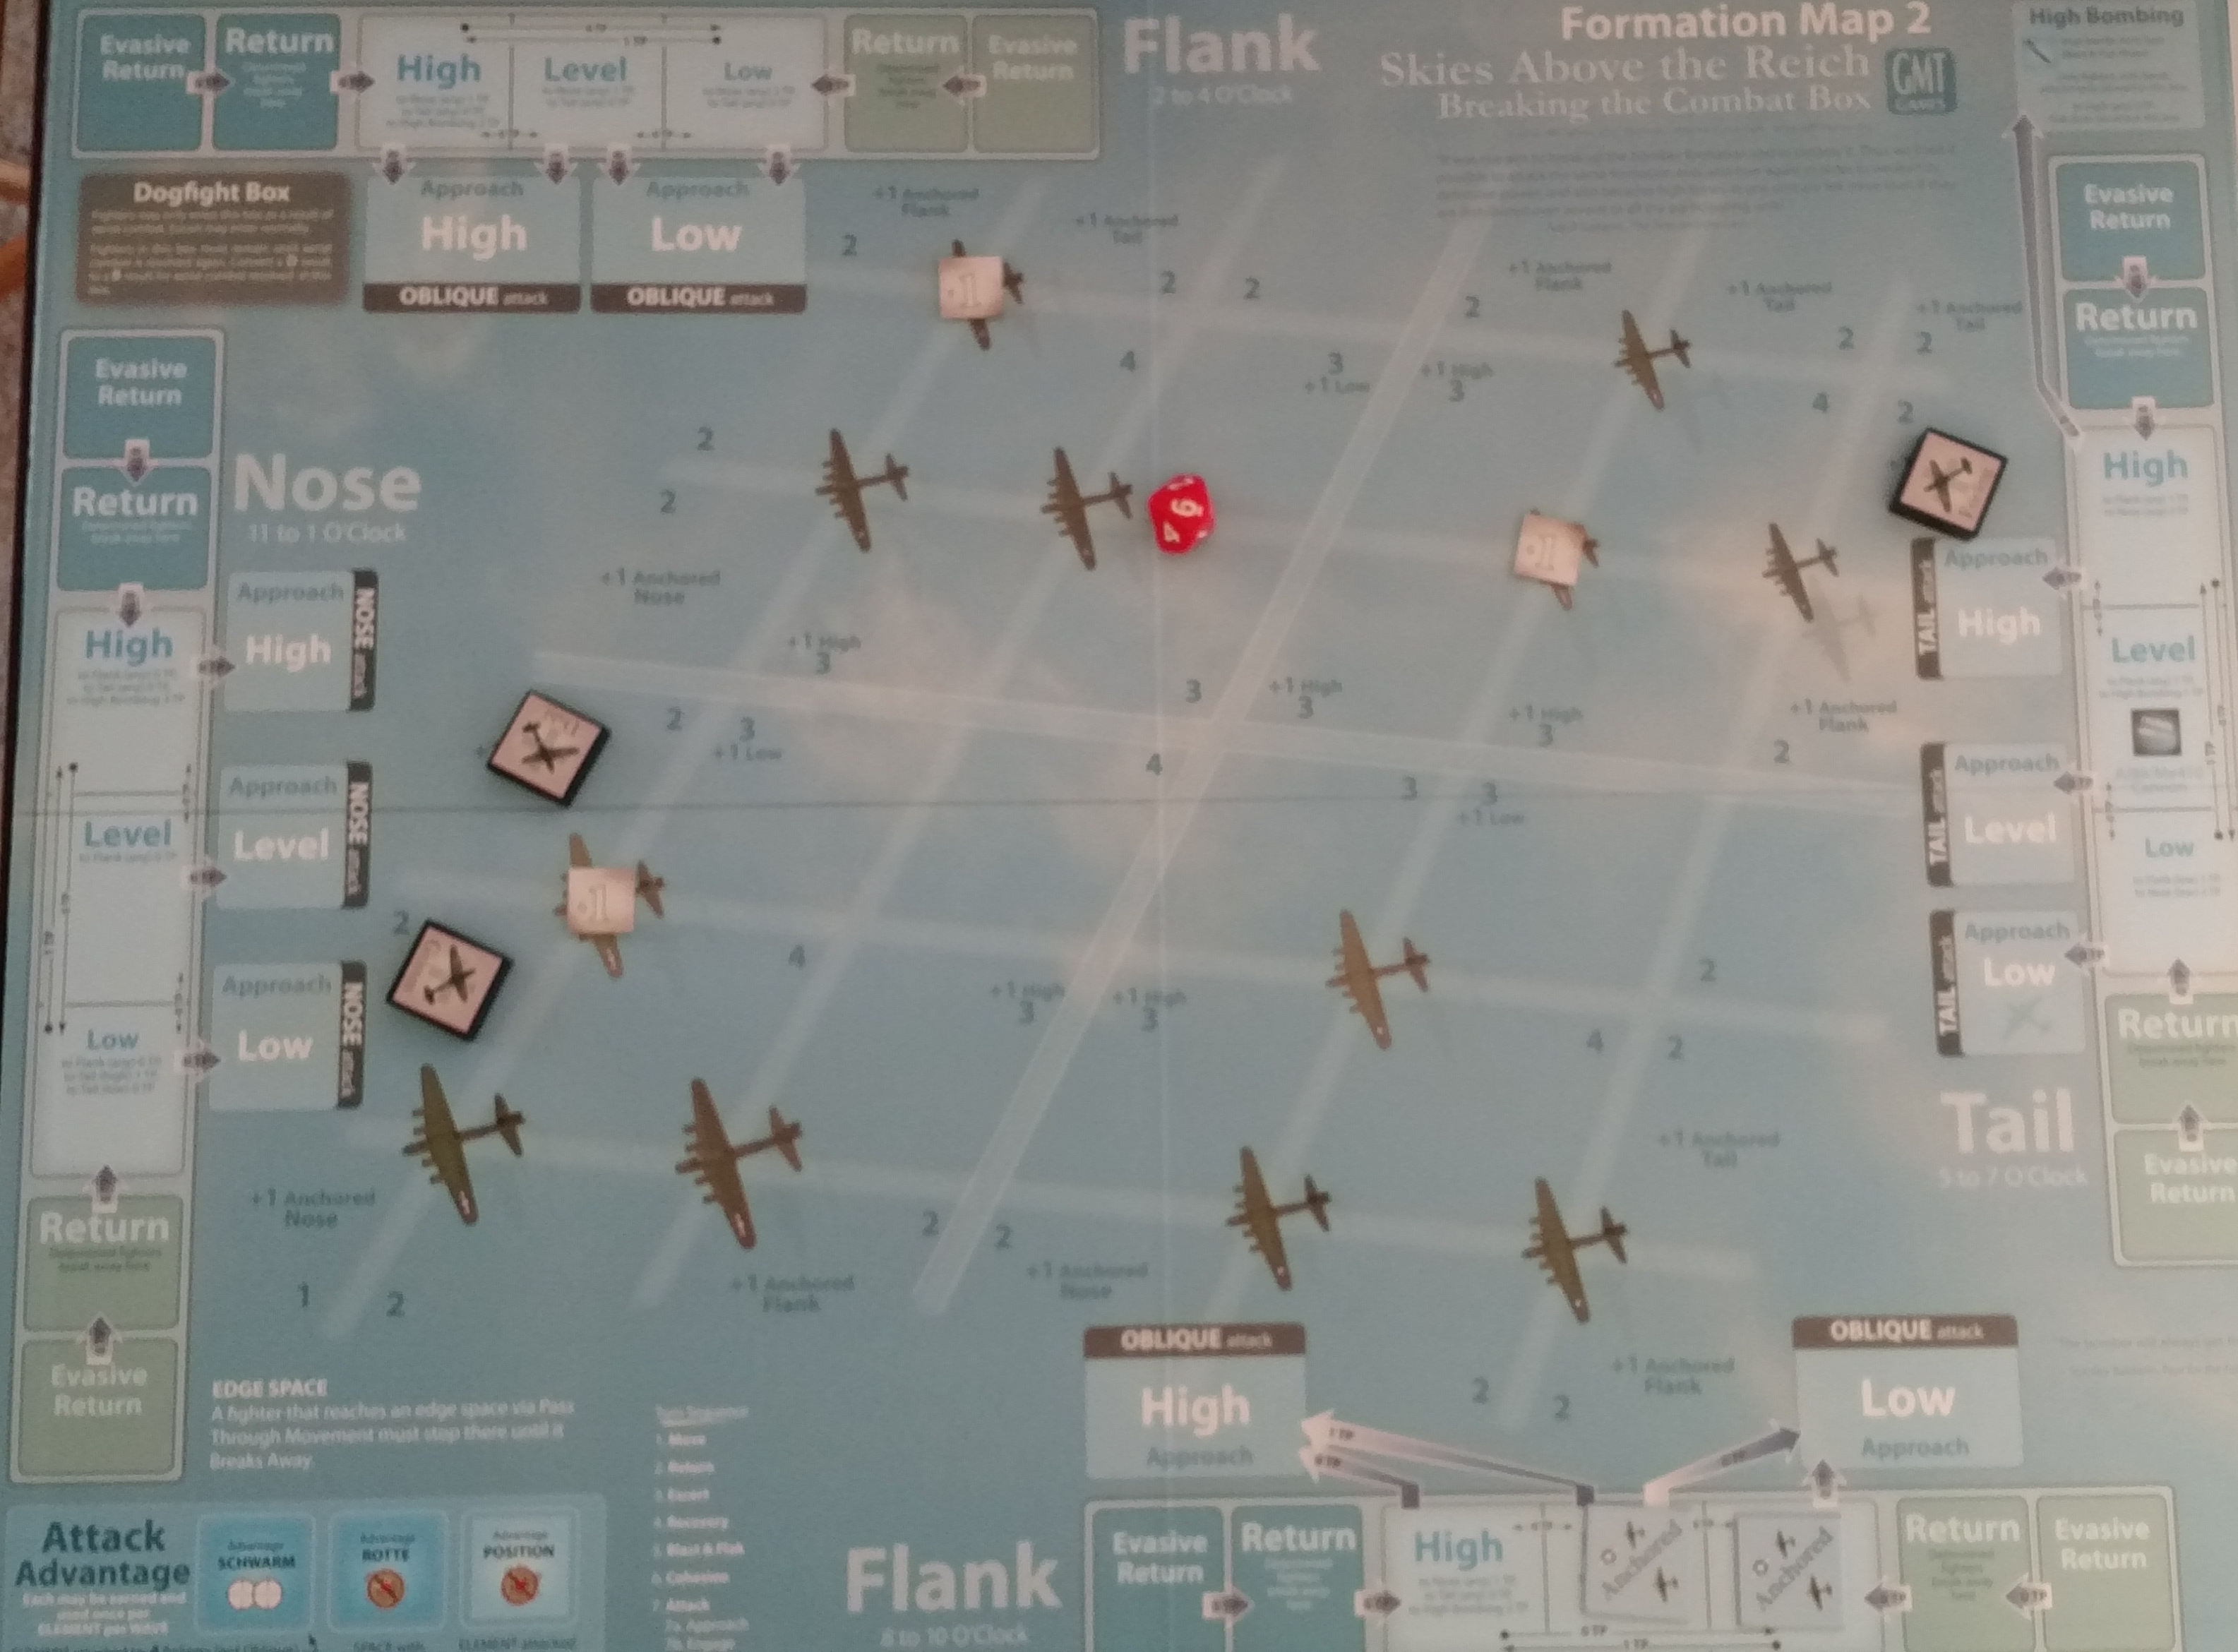
I wanted them to gang up on one of the damaged bombers, however Frieling must approach from the Tail, and the space behind that flank bomber in the lead element that Dahl and Grimm are going after is LL 3, and worse is one of the +1 Low spaces, and Frieling definitely approached from Low, so he’s just going to try for one of the bombers in the trailing element. All go Evasive, having seen what sort of thing happens to the overly Determined last mission. This highlights how “Zeal,” one of the potential Green penalties of new recruits, is actually a drawback. Forcing a pilot to take the Determined mode is as good as a death sentence in certain, high-Lethal Level situations.
Maneuvers: Dahl roll dive to Nose, Frieling climb to Nose, Grimm climb to Tail.
Burst phase (Where the Action Happens): Frieling scores nothing on his bomber, doesn’t have to pass through or anything, just hangs out. Dahl gets a pass through 1 only. Grimm draws a hit on the bomber, which turns out to be a wing hit. The front side of some damage chits has an arrow (fallen out) or a “blast” mark (destroyed) and a number, and Grimm’s happens to be one of those. This means there’s a chance of a catastrophic hit here. If you roll (on the d10) equal to or higher than the number on the chit, the catastrophic thing happens, the bomber either falls our or is destroyed (in the basic game, these results are equivalent; in the Advanced game, fallen out bombers can be pursued, but only destroyed bombers give VPs). The number on Grimm’s chit is a 10, and I roll a 3. No dice, and the damage on the other side is only 1. During Continuing Fire, the bombers fail to score any hits on my fighters, but Grimm pulls a card that has the “Lucky Shot” text, which means on his way out of his attack run he, somehow, managed to score an extra hit on the enemy. Good result! It turns out, however, to be a somewhat underwhelming 1dmg fuselage hit. All three fighters move to their respective Evasive Return boxes. Here we see another drawback to being Evasive: due to the turn structure (which goes Move, Return, etc.), fighters must Return from wherever exactly it is they go after shooting before they can line up another attack run. They’re dodging, weaving, fighting for altitude, turning around to pursue the bombers (which after all are moving toward their goal at a couple of hundred miles an hour), etc. This takes time. So the turn after a run is essentially dead for the fighters. If you’re Evasive, it’s two turns, because you spend one whole turn going from the Evasive Return box to the normal Return box, too.
Turn 3
All three fighters move from Evasive Return to Return.
Turn 4
Dahl returns to Nose Low, Frieling to Nose High, and Grimm to Tail High.
Turn 5
Dahl moves Nose Low approach, Grimm Tail High.
Somehow I messed up here. Since Frieling was on the Nose side of the board, he should have had to approach from the front of the bomber, but instead I stuck him in the Right Flank High approach box, perhaps misreading the board which says I could move him to any Flank from the Nose high box for 0 TP. While I could do this, I couldn’t also move him into an Approach box on the same turn. Mea culpa, although I don’t think it would have changed things too much, although I would have had to spread he and Dahl out, bomber-wise, unless I wanted to chance another potential collision like last mission, an outcome I’m pretty wary of now.
During the escort phase, the Spitfires arrive:
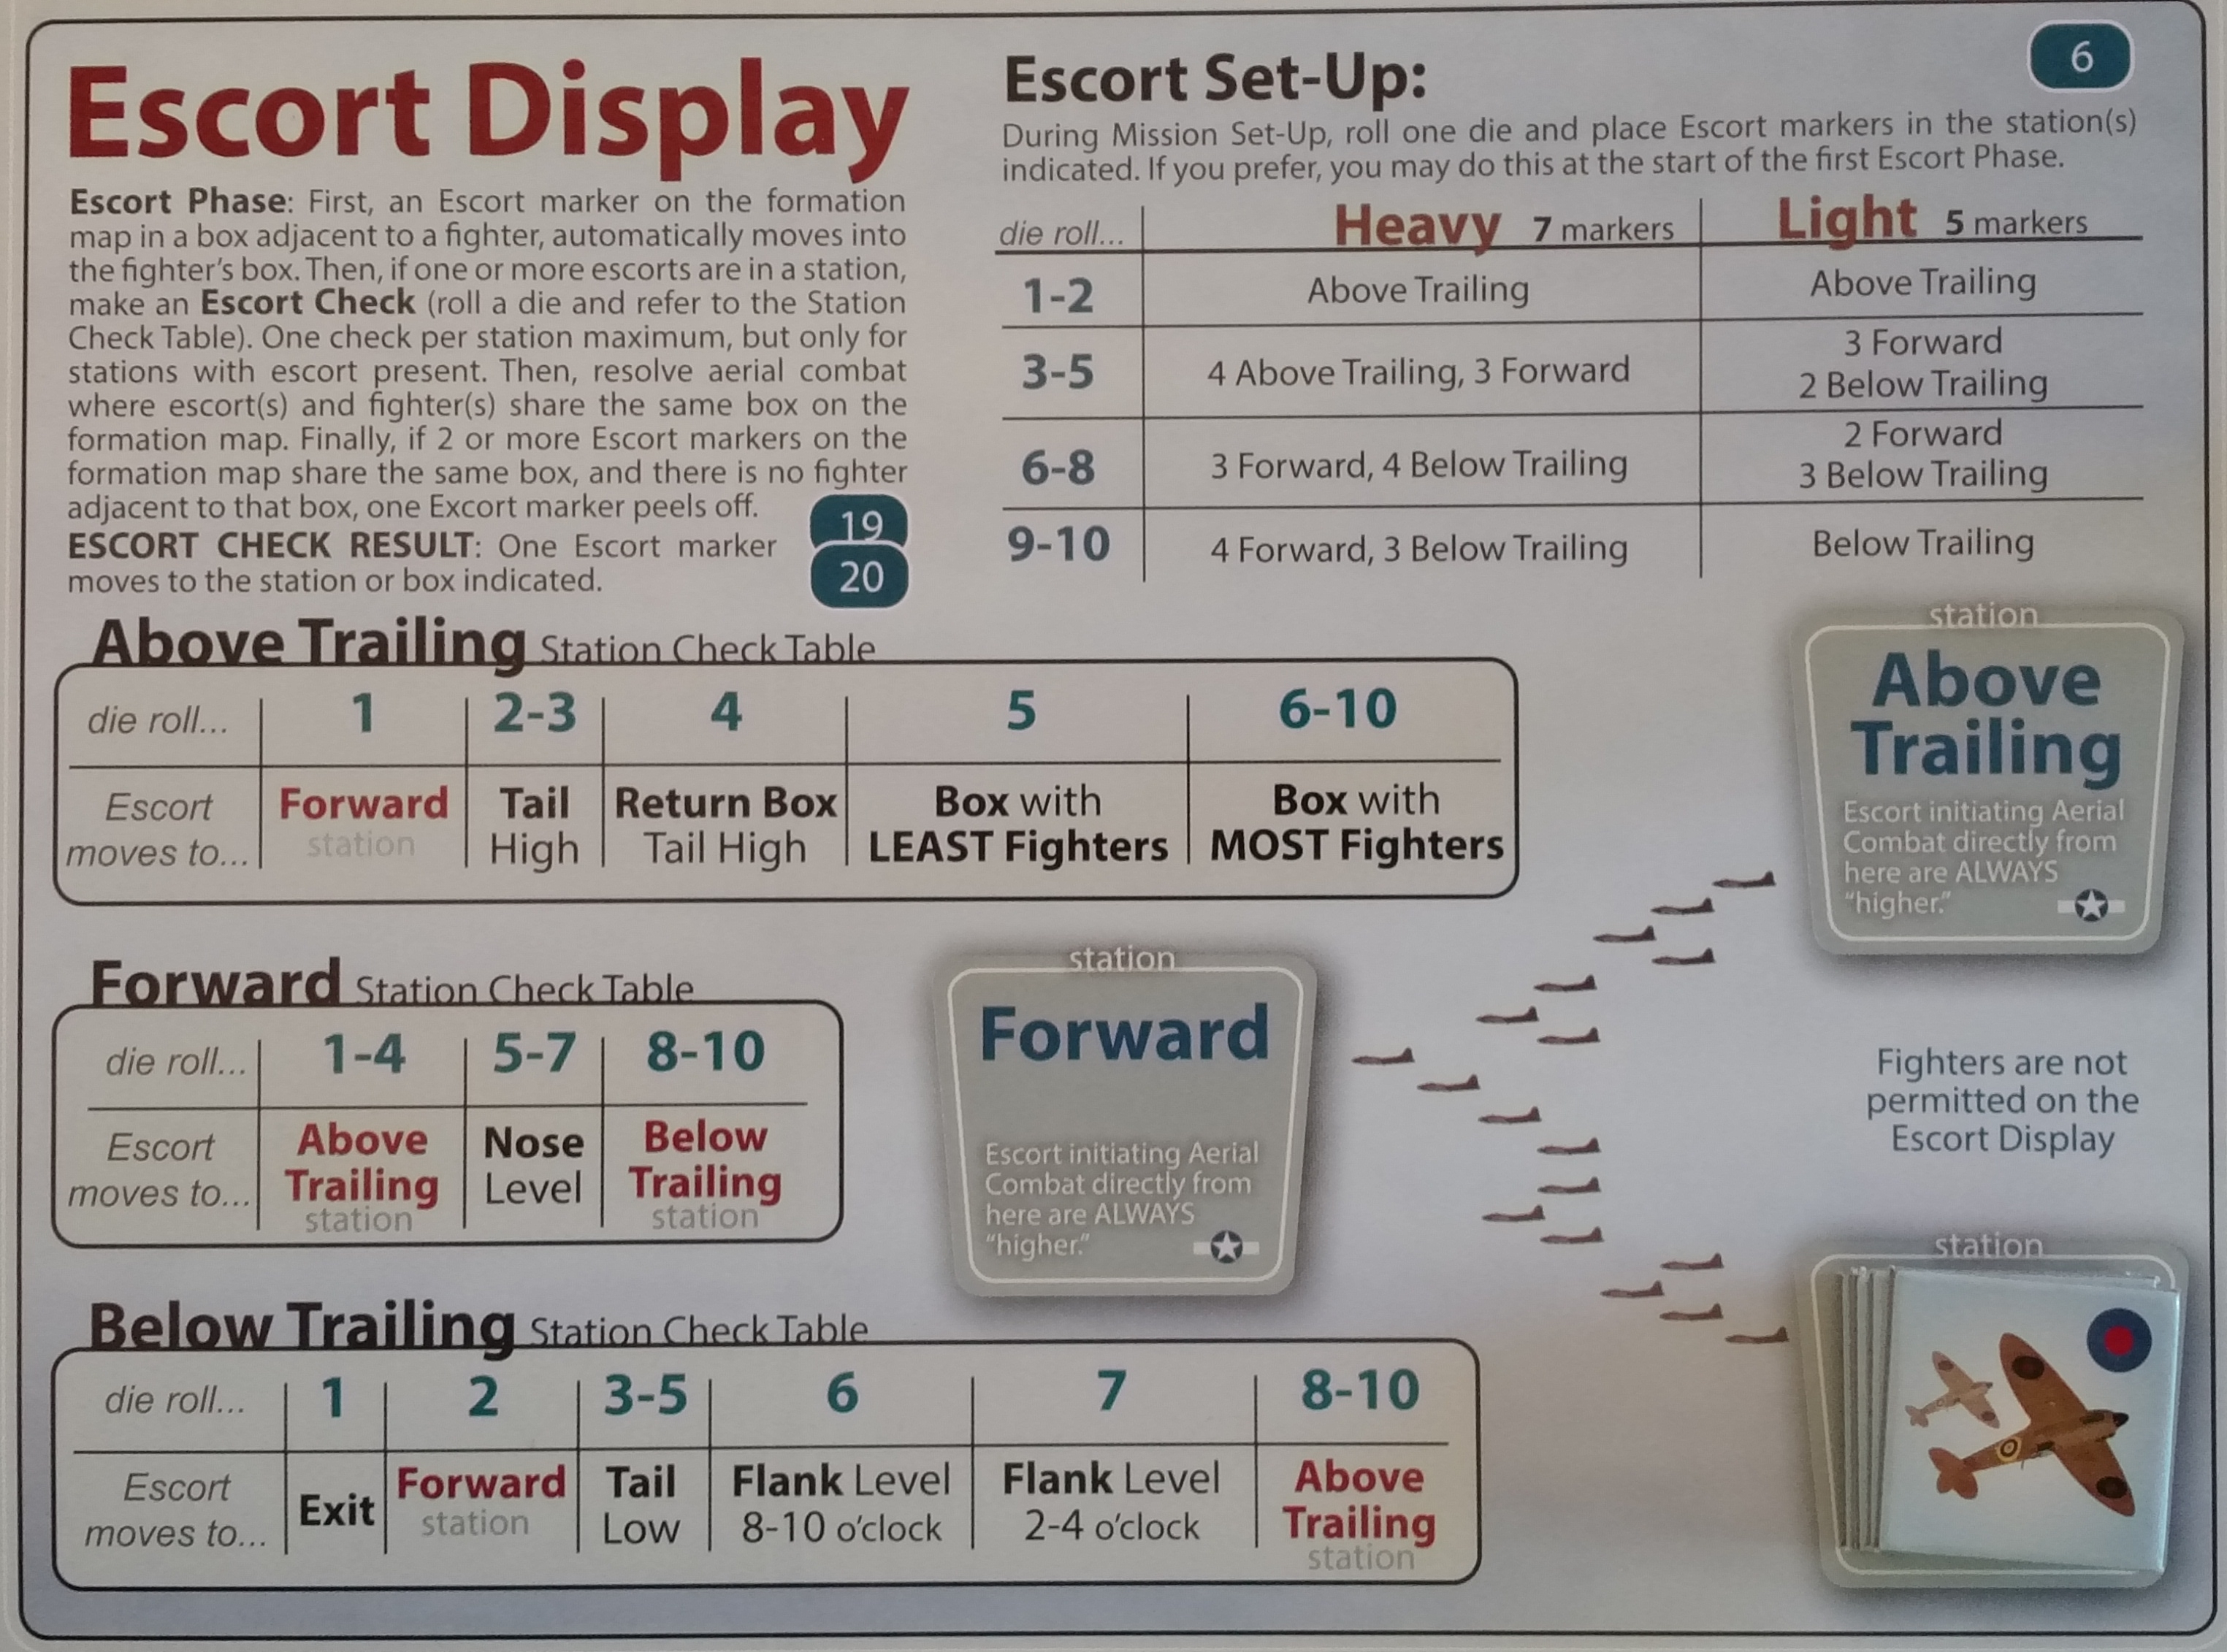
They hang out in this area off the map until the Station Check subphase of the Escort phase moves them onto the formation map, which happens now; 1 fighter can move from each station each turn. This turn, one Spit moves Right Flank Level. Now he’ll hang out there until another one joins him, or until one of my fighters moves into or adjacent to his box, at which point he’ll give chase.
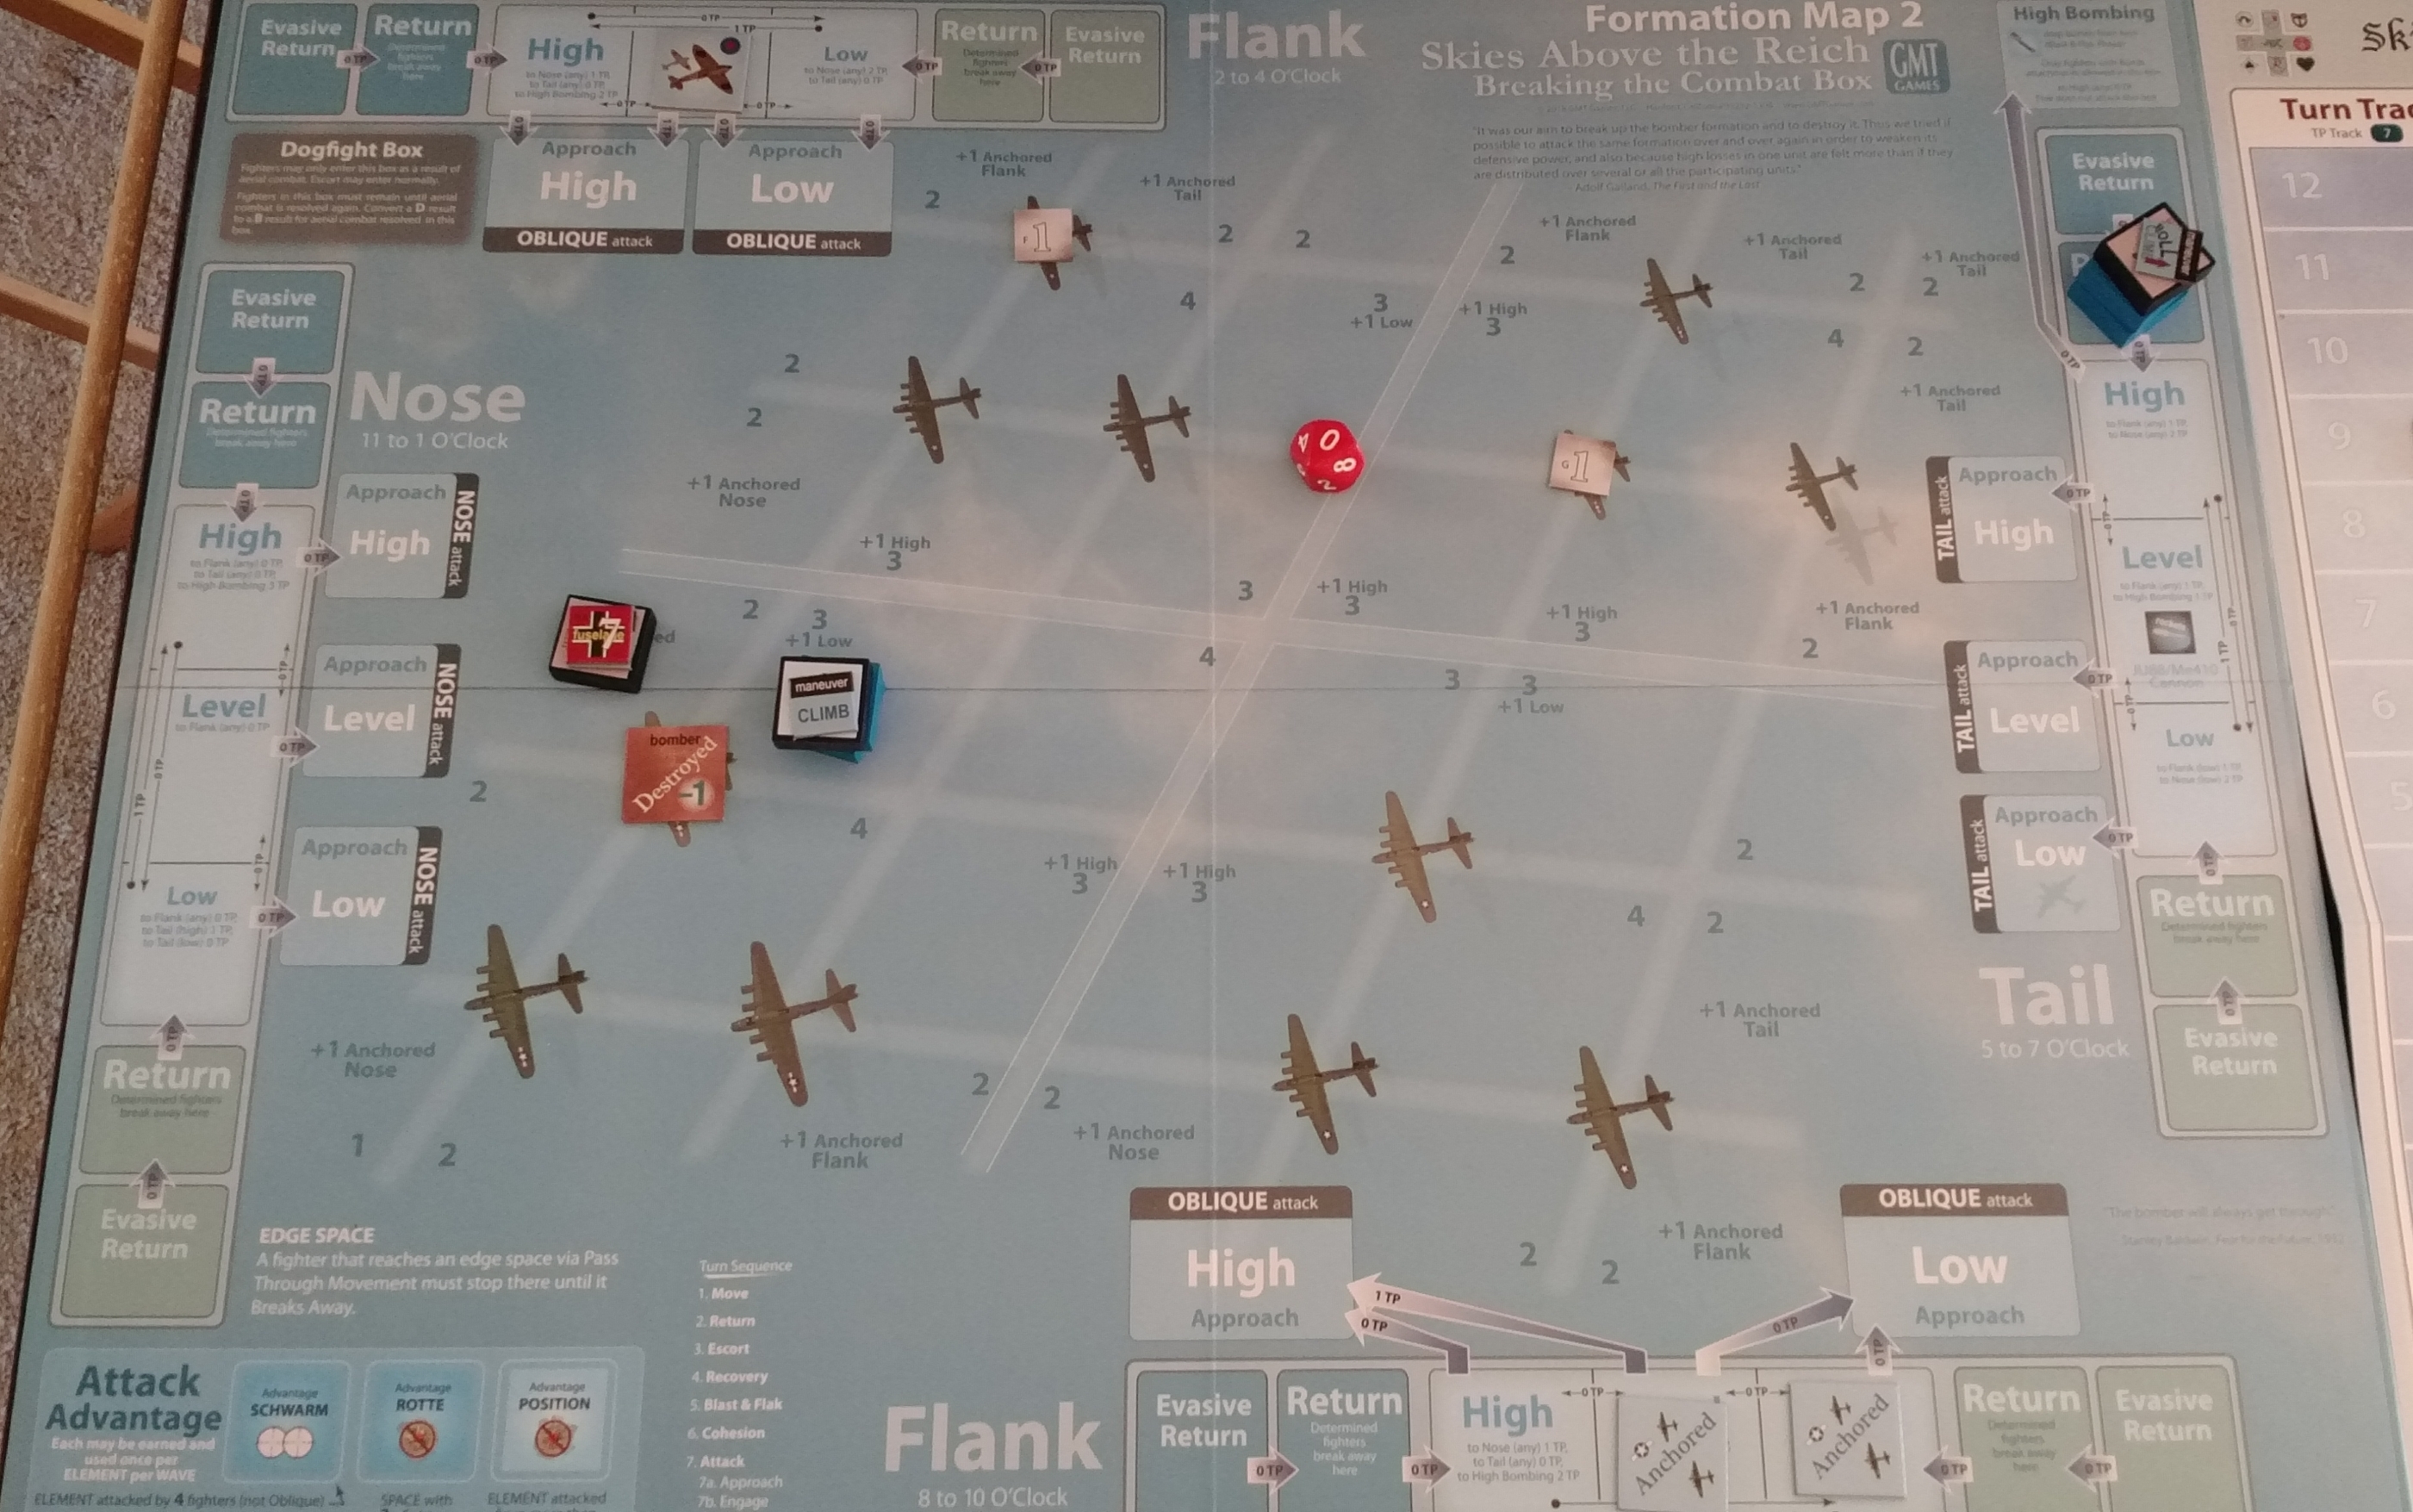
All three of my fighters gang up on that damaged bomber from last time. Grimm is chancing the LL 3 space in its rear because at least he doesn’t have to deal with the +1 LL, since it’s for Low approaches only and he’s coming from the High box. However, he goes Evasive just to be safe (uh…relatively speaking). The other two go Determined. For maneuvers, Grimm climbs (to Nose), Dahl climb rolls right (to Left Flank), Frieling climb rolls to Tail. Since two of my fighters attacked from separate directions AND altitudes (which is true even after my screw up, since Dahl came from Nose Low and Grimm from Tail High), I get the Advantage Position marker, which like the Rotte one from last mission will let me cancel one hit on my fighters in that element (which is all of them this turn).
The first card I draw is for Grimm, and it’s a hit! Draw a chit, and get another wing like last time, with a catastrophic destroyed 10 marking. Not expecting much, I roll the die and get a 10! So the bomber goes down just like that. Must have gotten a lucky hit on a gas tank with a tracer…or something, who knows! That’s 1 VP, the first for the staffel. You still pull cards for the other fighters who are attacking that bomber, because bombers didn’t necessarily do down instantly, and could be lethal even in their death throes. Time is somewhat flexible in Skies Above the Reich, reflecting the fluidity of the situation. Not every action follows mechanically after every other. Frieling’s card shows a hit on him, but I use the Advantage Position marker to cancel it. The card also had a Pass Through of 2, but use his Break Anywhere experte skill (once per mission) to avoid that, since it would put him in an LL 4 space for Continuing Fire, and send him off to the Tail Return box. That’s the situation in the image here:
Dahl also pulls a hit to his fighter, with Pass Through 1. Unable to cancel this hit, I draw him a chit, which is Fuselage 7. Ouch. Continuing Fire yields nothing. Grimm goes to Nose Evasive Return, Dahl to Right Flank Return.
Turn 6
Frieling Returns to High Tail, Grimm moves to the regular Nose Return box. Dahl, during the Recovery phase, rolls a 2 (remember, to make a hit trivial, you have to roll under the number on the chit). So the hit is serious and he goes to the Fuselage Fate box for the remainder of the mission, trying to get home in a busted ship. One Spitfire moves to Tail Low.
Turn 7
Frieling expends 1TP to move to Left Flank High (since it’ll give a more favorable position than the Tail for attacking another bomber in that element, which they are going to do because the destroyed bomber lowers the LL for the whole element by 1. Grimm returns to Nose High. One spit moves to the Above Trailing station from Below Trailing.
Turn 8
Frieling moves Left Flank High Oblique approach, Grimm moves Nose High Approach. One Spit moves Tail High from Below Trailing. The fighters both move in on the lead bomber of the lead element, both going Determined, and both climb rolling to stay away from the Tail (since there are now two escorts back there, and they will be impossible to avoid). Grimm deals 1dmg to the fuselage of the bomber, gets a pass through and moves on. Frieling takes a hit (cockpit 5) and also passes through a bit. Grimm’s Continuing Fire card contains the “Pull Away” text, forcing him to draw another card and also apply that result. Fortunately it’s nothing. Frieling gets “Friendly Fire,” which is much better than it sounds, referring to friendly fire among the bombers. Roll a die, and an even result means the bomber takes a hit, which turns out to be another wing hit, for 3 dmg with no catastrophic result (alas).
Turn 9
The last turn of the mission, this is just mopping up at this point. Grimm returns Left Flank High, Frieling makes his recovery roll, meaning the hit was trivial (just a scratch!), and one escort moves to Above Trailing. That done, the fighters turn for home.
CUT TO
Meanwhile, Dahl has been nursing his fighter homeward. Just before he reaches the airfield, it gives out, and he crashes. HOWEVER, he manages to bail out, emerging from the ordeal unscathed and earning himself an experience point. Grimm, as the pilot who scored the staffel’s so-far sole victory, is showered in both champagne and also two experience points, bringing him up to 3. Two more and he can buy another experte skill.
So that was Mission 2. All in all, much better result than Mission 1, despite the deadlier map and my unknowingly hamstringing myself with the -3 OPs. There are four missions left in 1942. To “not lose” I need to score 4 more VPs. To win I need to score 14 more. Needless to say, a daunting prospect.