
Sneak preview: Mission 2 went…ok.
The mood in the staffel was grim following the last mission. Two pilots dead, one wounded, and the next mission sure to be tougher. A few days later the mission was handed down, and sure enough it would make the first one, on paper at least, look like a milk run:
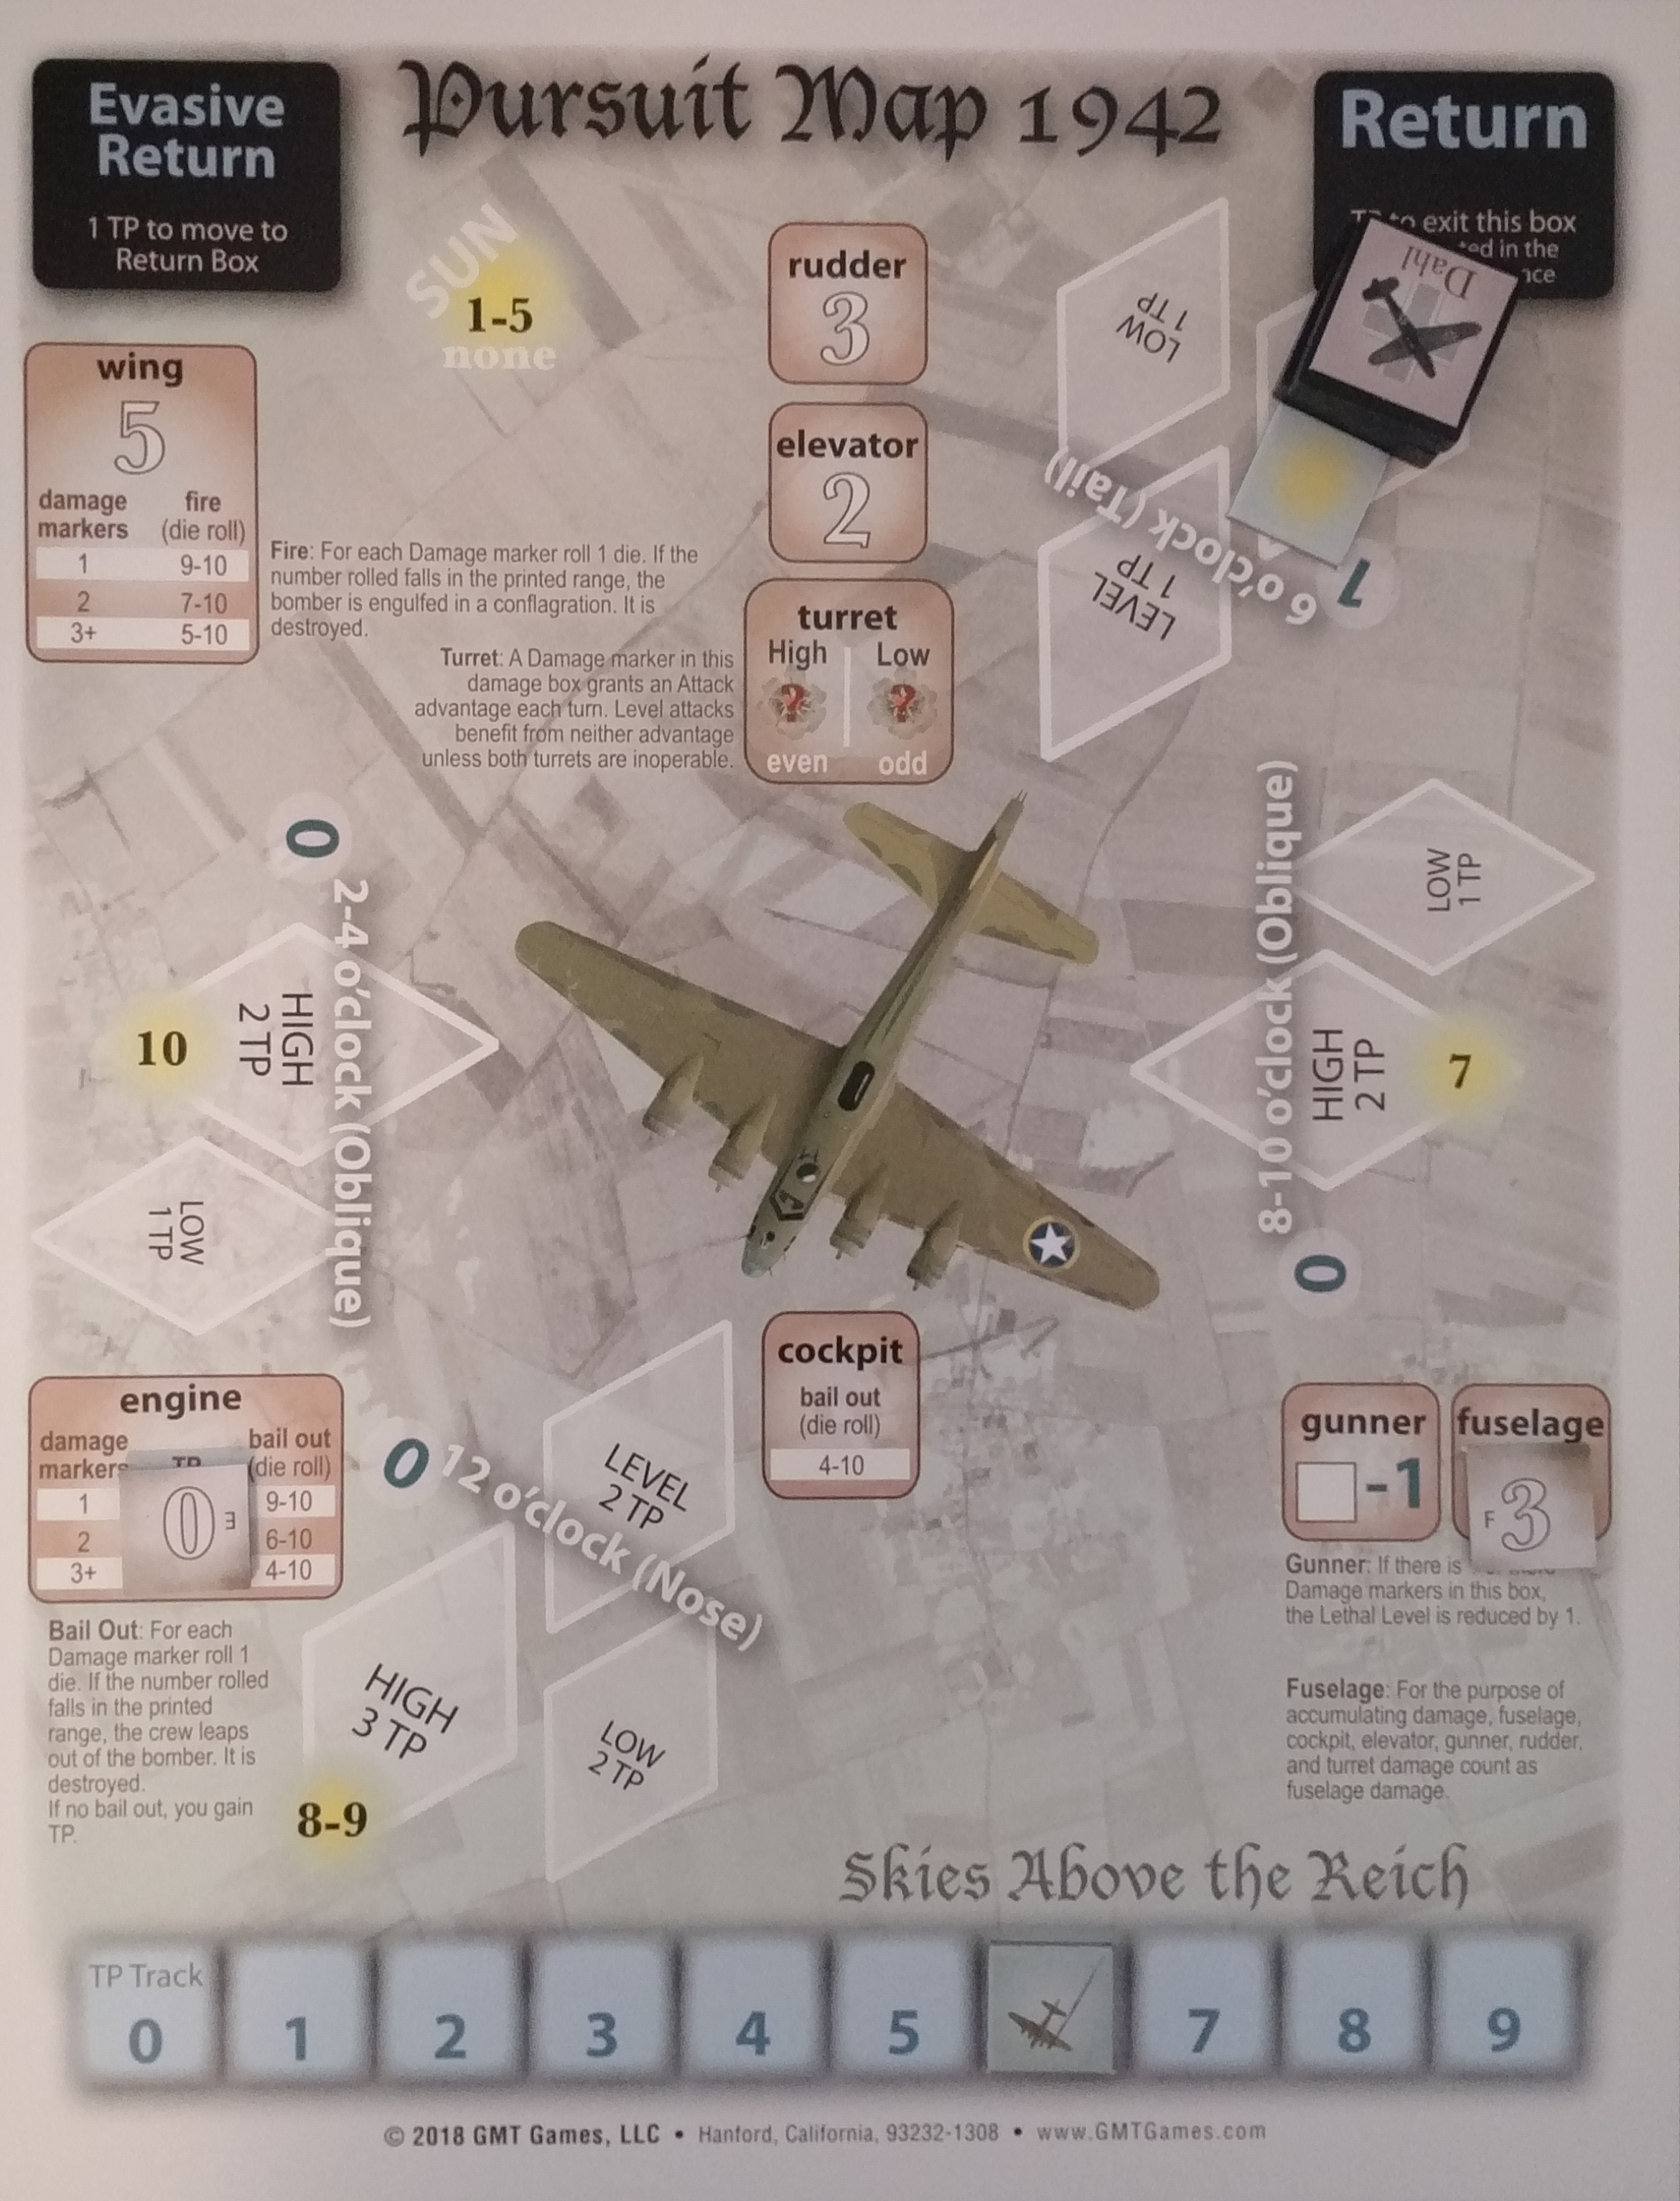
Map: 2 (a full-bore combat box this time, no more fooling about with lesser formations)
Mission Type: Outbound (Again! Ugh. Outbound missions tradeoff a little operation security at the beginning of the mission for less chance of scoring, because [again, in the basic game] fallen out or destroyed bombers are worth 2 VPs on an Inbound mission, but only 1 on Outbound or Near Target missions. Near Target, I suppose, forces the bombers to contend with flak in addition to your own ministrations)
Operations Points: 6 (I erroneously thought I had to subtract 3 OPs from this, although a post-mission reading of the rulebook revealed that your own fighters don’t count toward negative OPs when lost, only auxiliary fighters; so I unnecessarily handicapped myself by only fielding three fighters this mission)
Escort: L5S (light escort [5 planes], showing up on turn 5, Spitfires)
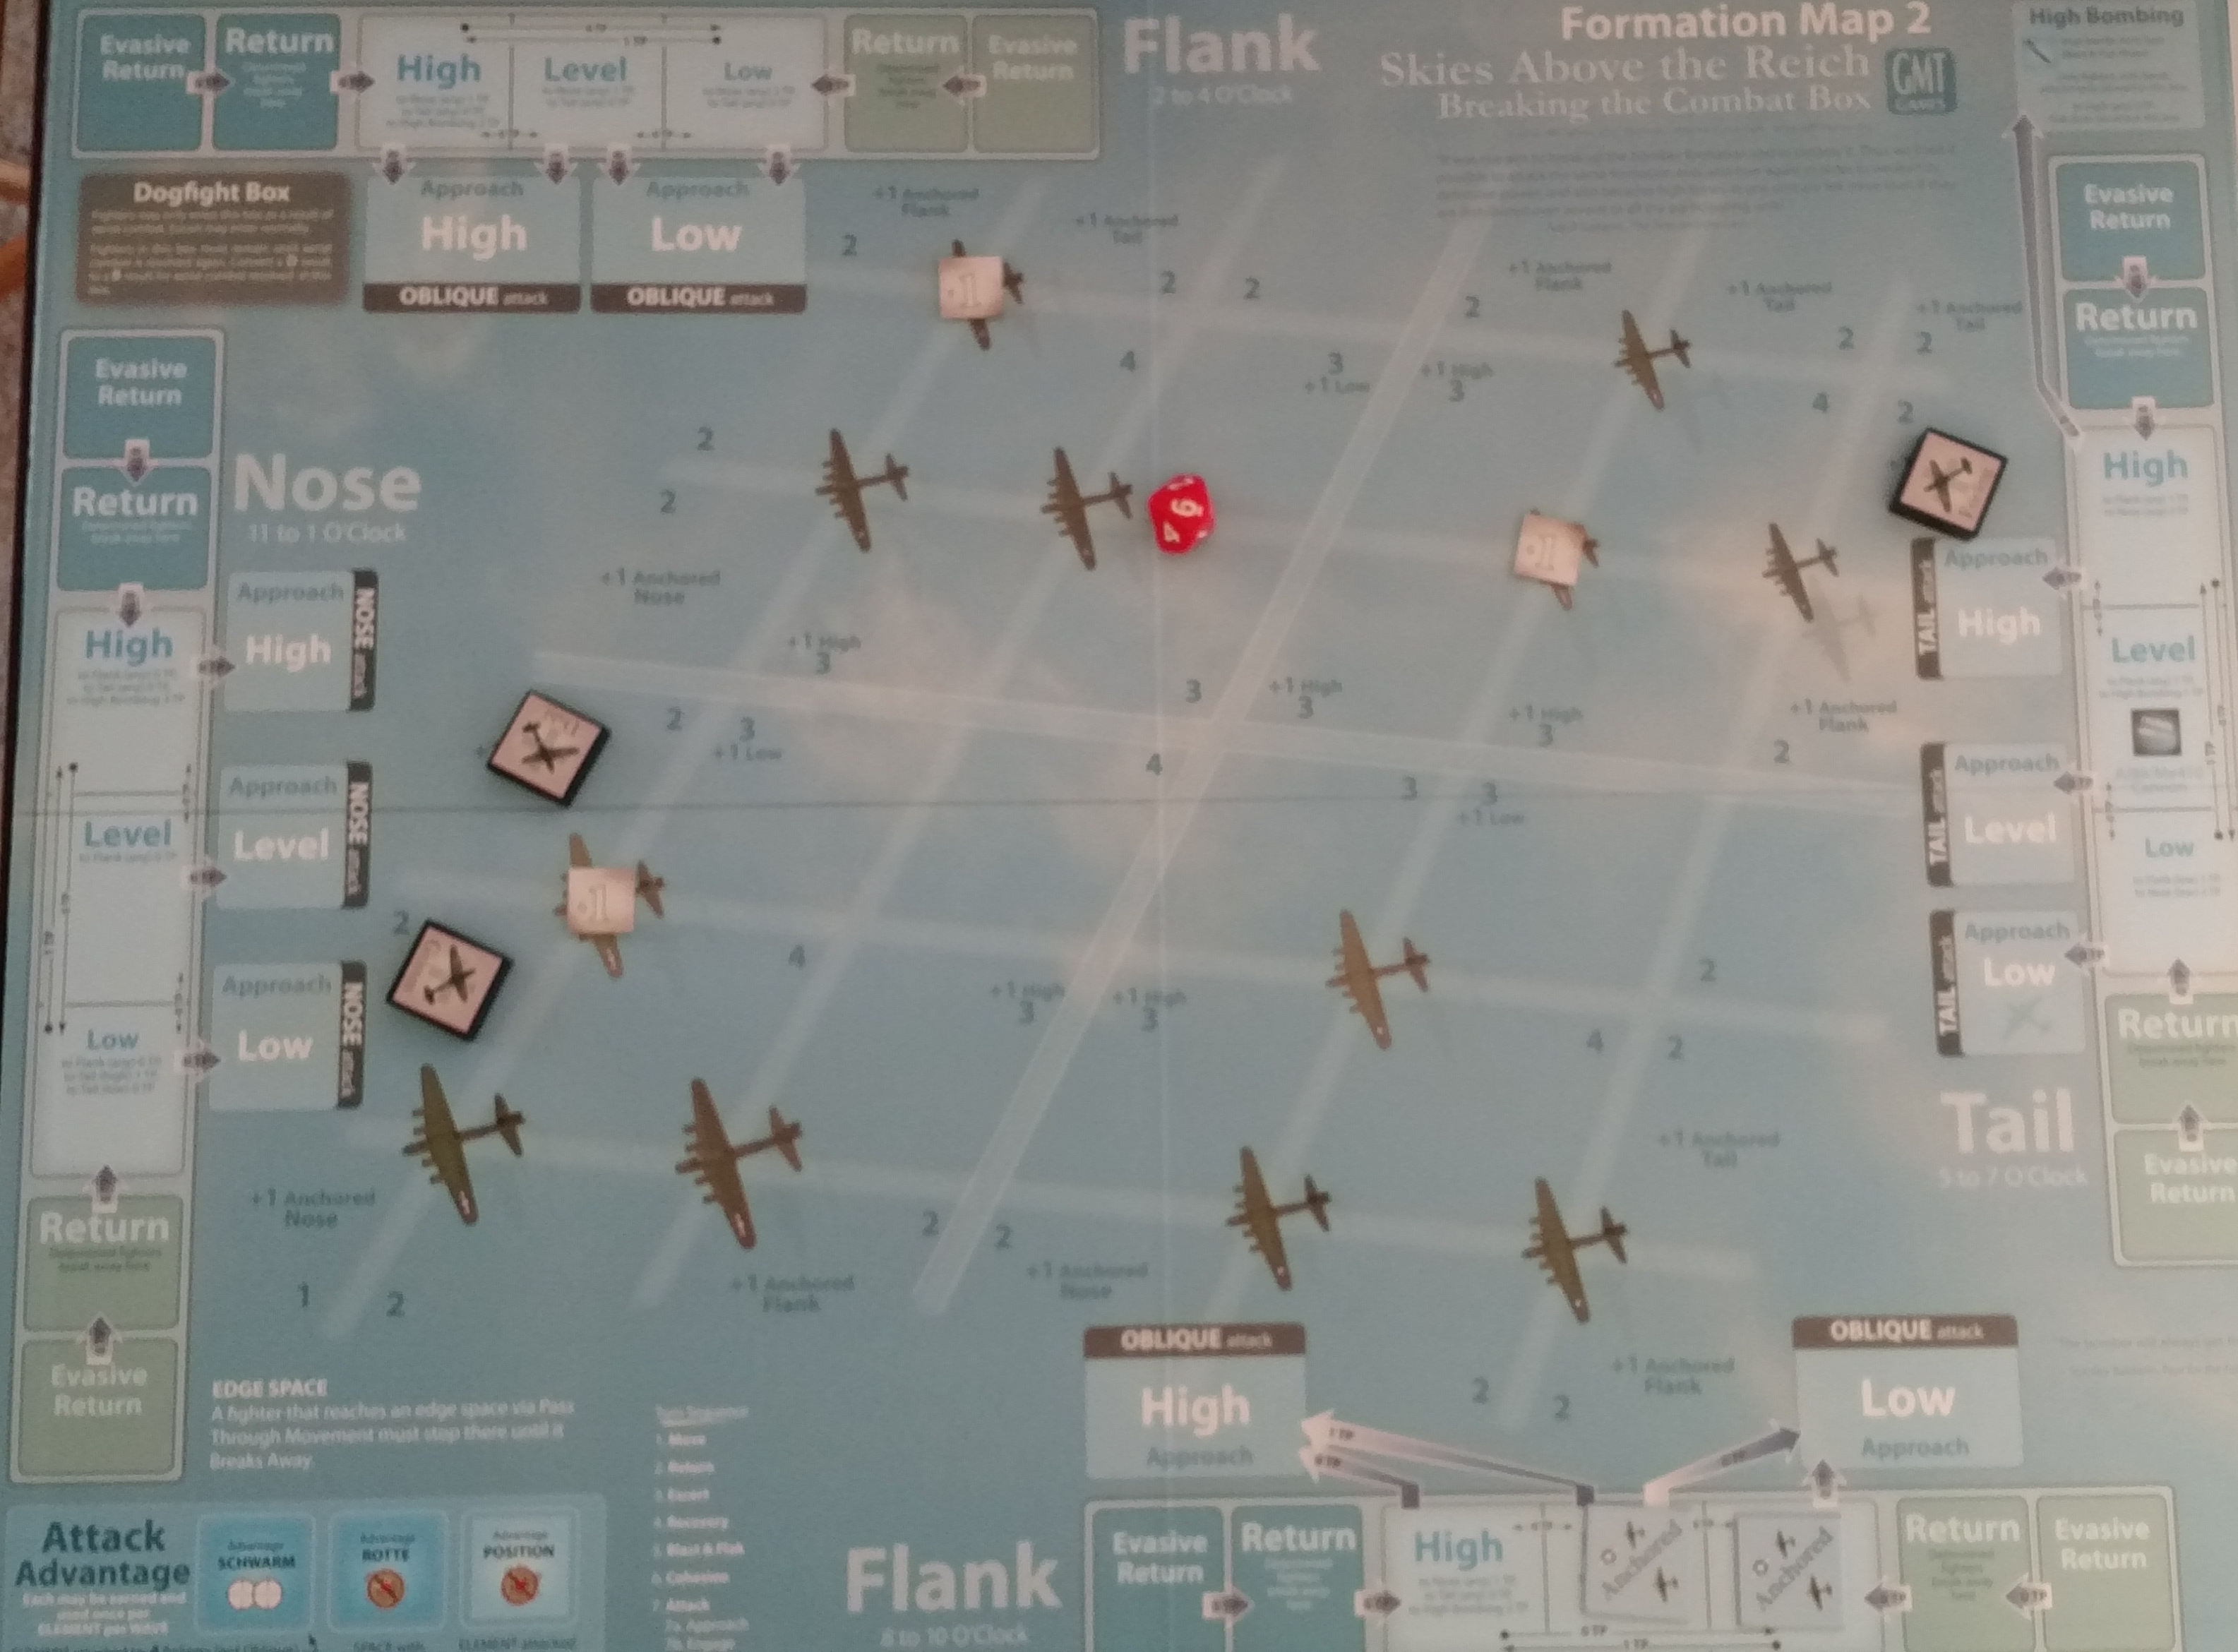
Clade remained unfit to fly, so Dahl, Frieling and Grimm were tapped to take on the mission. Upon arriving at the formation, the situation was as follows:
Damage: Three markers, all 1-point fuselage hits, got put down on separate bombers.
Anchored: Level & Low 8-10 (“Left” from here on) Flank. This is new for me this mission. Anchoring is intended to represent off-map elements of the formation assisting with the defense of elements shown on the map, presumably by filling the sky with so much lead the fighters are prevented from using those avenues of approach, because having an Anchored token in that box means your fighters cannot enter it.
Sun: None. Must have been an overcast day.
Tactical Points: 6
Flight Limit: 9 turns. The variable flight limit is intended to simulate conditions your fighters had to undergo to reach the formation. Maybe they had trouble getting into position, used more fuel, etc. Who knows. The thing is, this is the number of turns they can stay on station before having to turn for home.
Turn 1
Dahl enters the map on 2-4 (“Right”) Flank Low. Frieling enters Tail Low. Grimm enters Nose Low. As a reminder, all fighters always enter Low. First turn, all the can do is enter and size things up. This map has a few new features compared to the last one. Some of the spots, for one thing, are Lethal Level 4. Some get a +1 bonus to LL if their corresponding map side has any Anchored spots, which means I won’t be doing too many attacks from the Left Flank. Some get a +1 LL bonus if you approach from a certain altitude, e.g. Low. Lot to take in.
Turn 2
Might as well get on with the job of knocking down some bombers. Dahl moves Oblique Low Approach. Frieling moves Tail Low Approach, Grimm moves Nose Low Approach, and in the Attack phase they get moved onto the map like so (picture’s a bit fuzzy; this time I used my phone rather than my Fancy Camera):
I wanted them to gang up on one of the damaged bombers, however Frieling must approach from the Tail, and the space behind that flank bomber in the lead element that Dahl and Grimm are going after is LL 3, and worse is one of the +1 Low spaces, and Frieling definitely approached from Low, so he’s just going to try for one of the bombers in the trailing element. All go Evasive, having seen what sort of thing happens to the overly Determined last mission. This highlights how “Zeal,” one of the potential Green penalties of new recruits, is actually a drawback. Forcing a pilot to take the Determined mode is as good as a death sentence in certain, high-Lethal Level situations.
Maneuvers: Dahl roll dive to Nose, Frieling climb to Nose, Grimm climb to Tail.
Burst phase (Where the Action Happens): Frieling scores nothing on his bomber, doesn’t have to pass through or anything, just hangs out. Dahl gets a pass through 1 only. Grimm draws a hit on the bomber, which turns out to be a wing hit. The front side of some damage chits has an arrow (fallen out) or a “blast” mark (destroyed) and a number, and Grimm’s happens to be one of those. This means there’s a chance of a catastrophic hit here. If you roll (on the d10) equal to or higher than the number on the chit, the catastrophic thing happens, the bomber either falls our or is destroyed (in the basic game, these results are equivalent; in the Advanced game, fallen out bombers can be pursued, but only destroyed bombers give VPs). The number on Grimm’s chit is a 10, and I roll a 3. No dice, and the damage on the other side is only 1. During Continuing Fire, the bombers fail to score any hits on my fighters, but Grimm pulls a card that has the “Lucky Shot” text, which means on his way out of his attack run he, somehow, managed to score an extra hit on the enemy. Good result! It turns out, however, to be a somewhat underwhelming 1dmg fuselage hit. All three fighters move to their respective Evasive Return boxes. Here we see another drawback to being Evasive: due to the turn structure (which goes Move, Return, etc.), fighters must Return from wherever exactly it is they go after shooting before they can line up another attack run. They’re dodging, weaving, fighting for altitude, turning around to pursue the bombers (which after all are moving toward their goal at a couple of hundred miles an hour), etc. This takes time. So the turn after a run is essentially dead for the fighters. If you’re Evasive, it’s two turns, because you spend one whole turn going from the Evasive Return box to the normal Return box, too.
Turn 3
All three fighters move from Evasive Return to Return.
Turn 4
Dahl returns to Nose Low, Frieling to Nose High, and Grimm to Tail High.
Turn 5
Dahl moves Nose Low approach, Grimm Tail High.
Somehow I messed up here. Since Frieling was on the Nose side of the board, he should have had to approach from the front of the bomber, but instead I stuck him in the Right Flank High approach box, perhaps misreading the board which says I could move him to any Flank from the Nose high box for 0 TP. While I could do this, I couldn’t also move him into an Approach box on the same turn. Mea culpa, although I don’t think it would have changed things too much, although I would have had to spread he and Dahl out, bomber-wise, unless I wanted to chance another potential collision like last mission, an outcome I’m pretty wary of now.
During the escort phase, the Spitfires arrive:
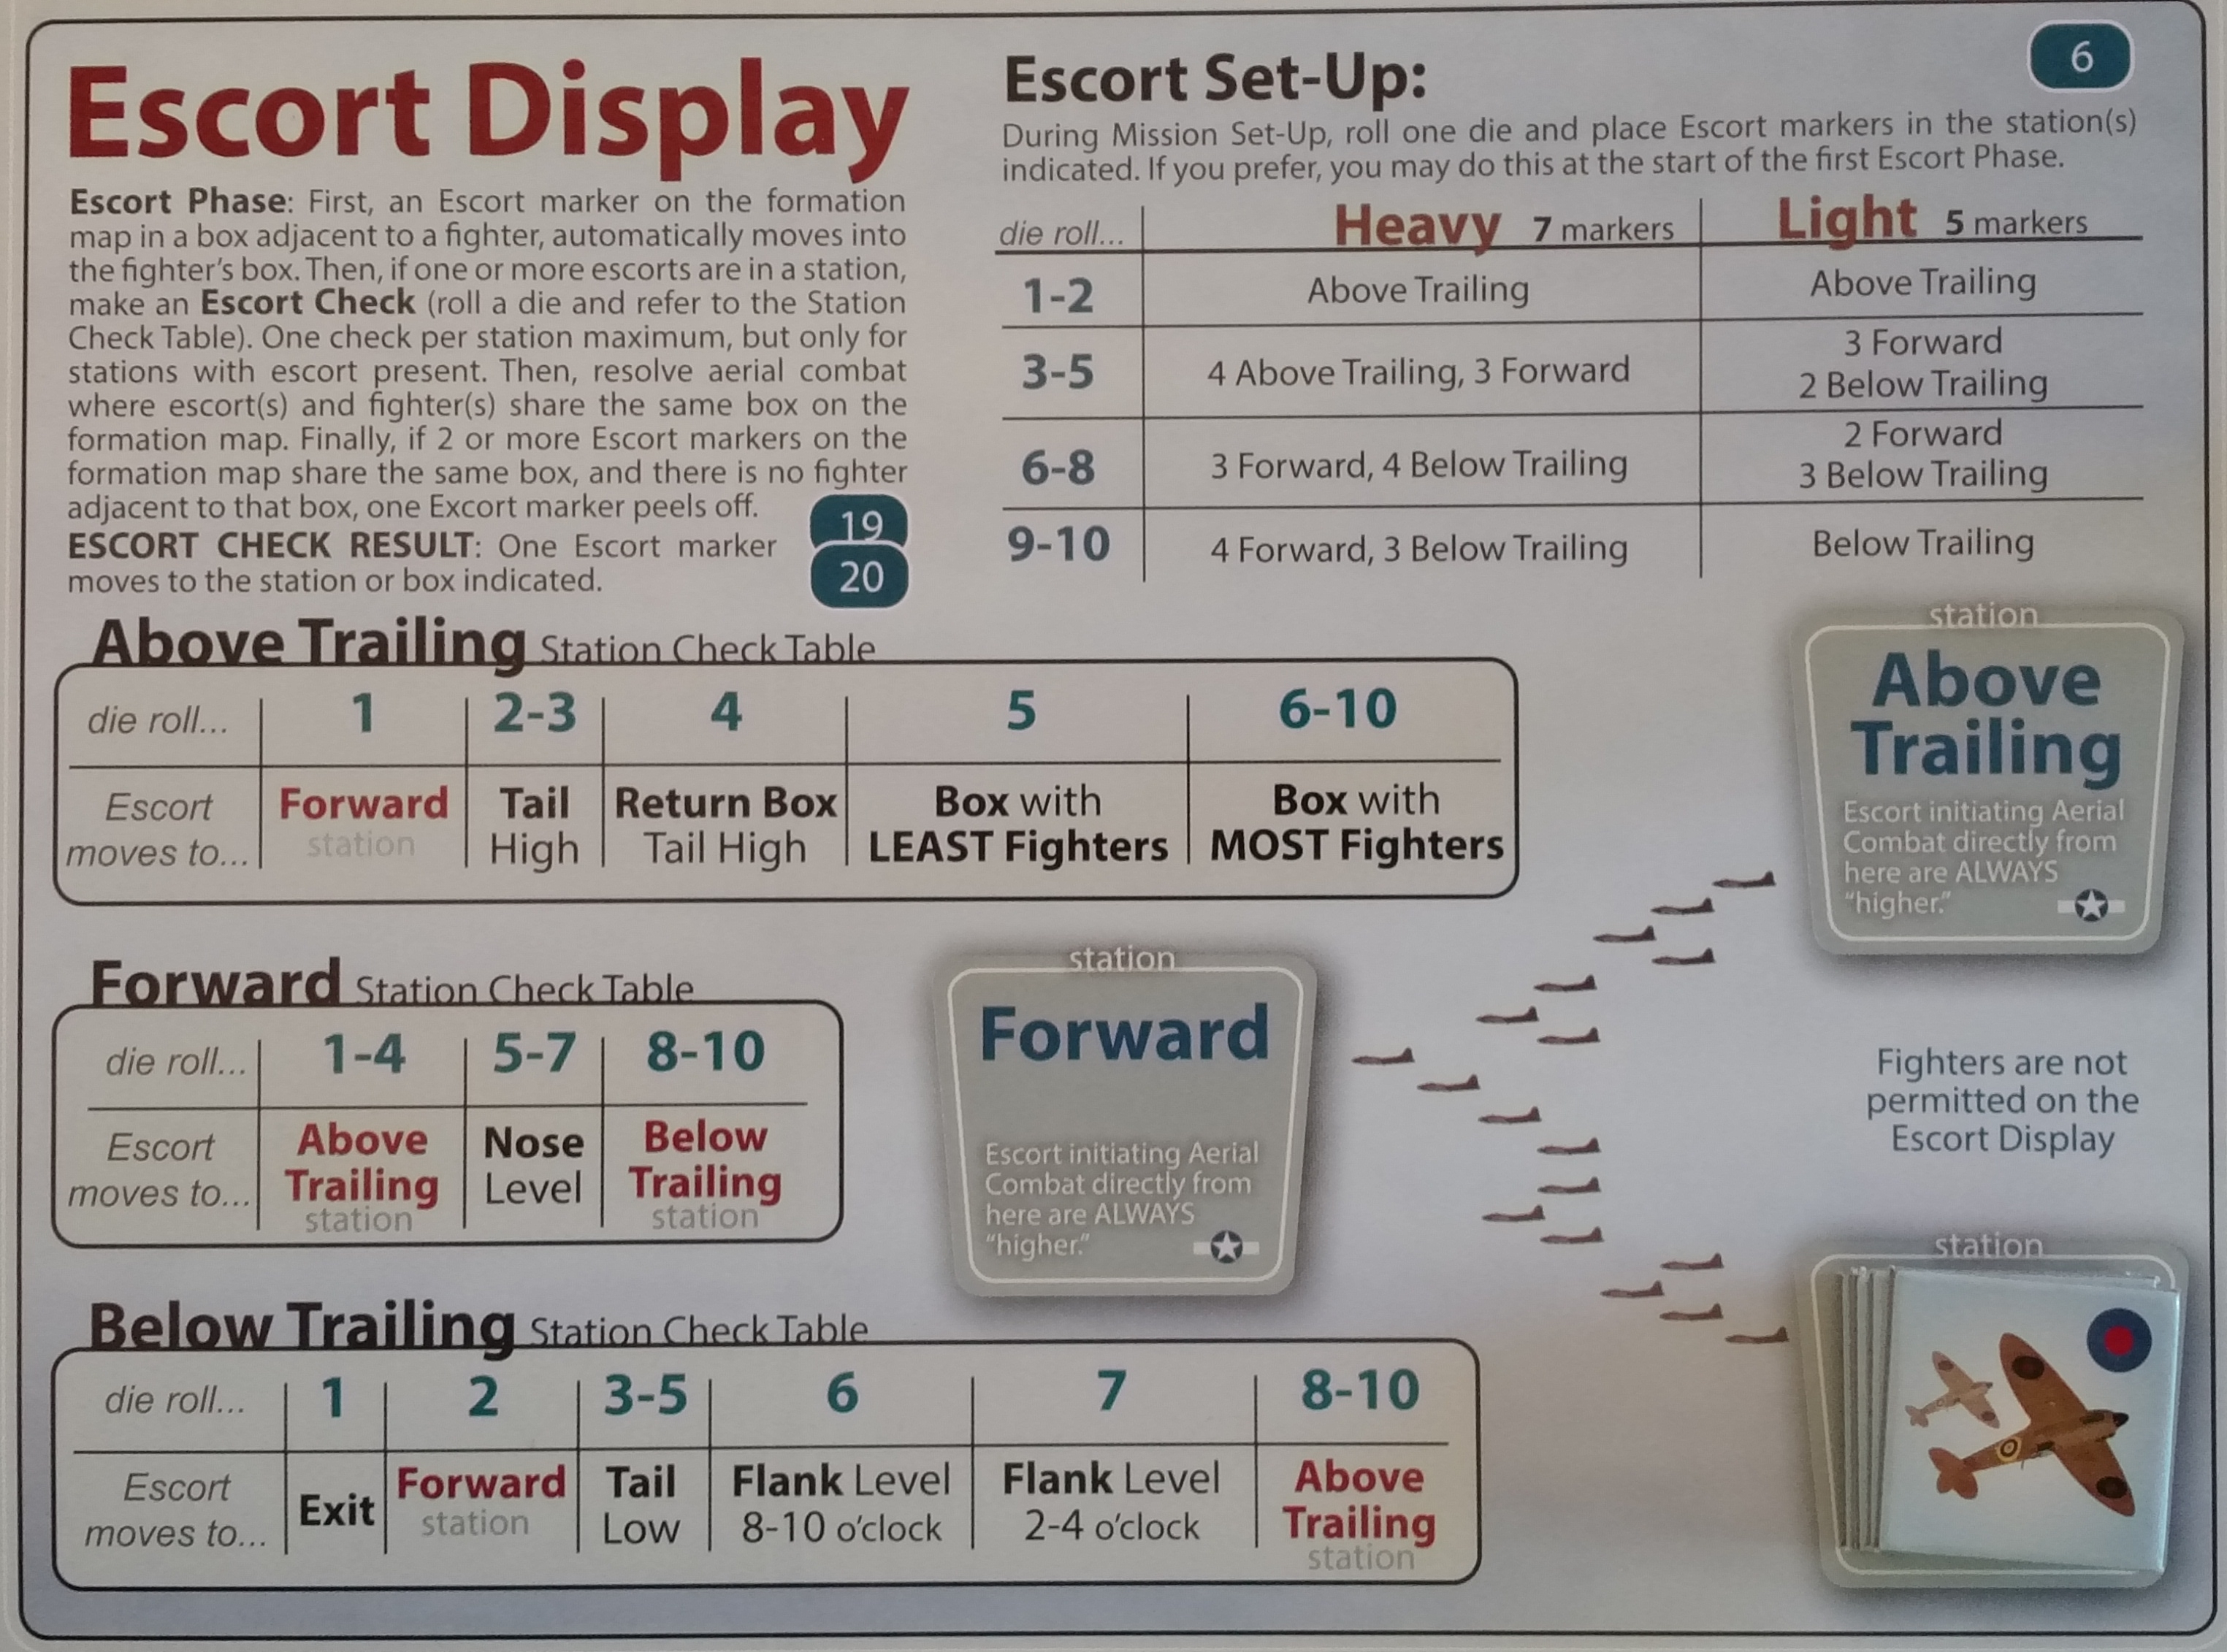
They hang out in this area off the map until the Station Check subphase of the Escort phase moves them onto the formation map, which happens now; 1 fighter can move from each station each turn. This turn, one Spit moves Right Flank Level. Now he’ll hang out there until another one joins him, or until one of my fighters moves into or adjacent to his box, at which point he’ll give chase.
All three of my fighters gang up on that damaged bomber from last time. Grimm is chancing the LL 3 space in its rear because at least he doesn’t have to deal with the +1 LL, since it’s for Low approaches only and he’s coming from the High box. However, he goes Evasive just to be safe (uh…relatively speaking). The other two go Determined. For maneuvers, Grimm climbs (to Nose), Dahl climb rolls right (to Left Flank), Frieling climb rolls to Tail. Since two of my fighters attacked from separate directions AND altitudes (which is true even after my screw up, since Dahl came from Nose Low and Grimm from Tail High), I get the Advantage Position marker, which like the Rotte one from last mission will let me cancel one hit on my fighters in that element (which is all of them this turn).
The first card I draw is for Grimm, and it’s a hit! Draw a chit, and get another wing like last time, with a catastrophic destroyed 10 marking. Not expecting much, I roll the die and get a 10! So the bomber goes down just like that. Must have gotten a lucky hit on a gas tank with a tracer…or something, who knows! That’s 1 VP, the first for the staffel. You still pull cards for the other fighters who are attacking that bomber, because bombers didn’t necessarily do down instantly, and could be lethal even in their death throes. Time is somewhat flexible in Skies Above the Reich, reflecting the fluidity of the situation. Not every action follows mechanically after every other. Frieling’s card shows a hit on him, but I use the Advantage Position marker to cancel it. The card also had a Pass Through of 2, but use his Break Anywhere experte skill (once per mission) to avoid that, since it would put him in an LL 4 space for Continuing Fire, and send him off to the Tail Return box. That’s the situation in the image here:
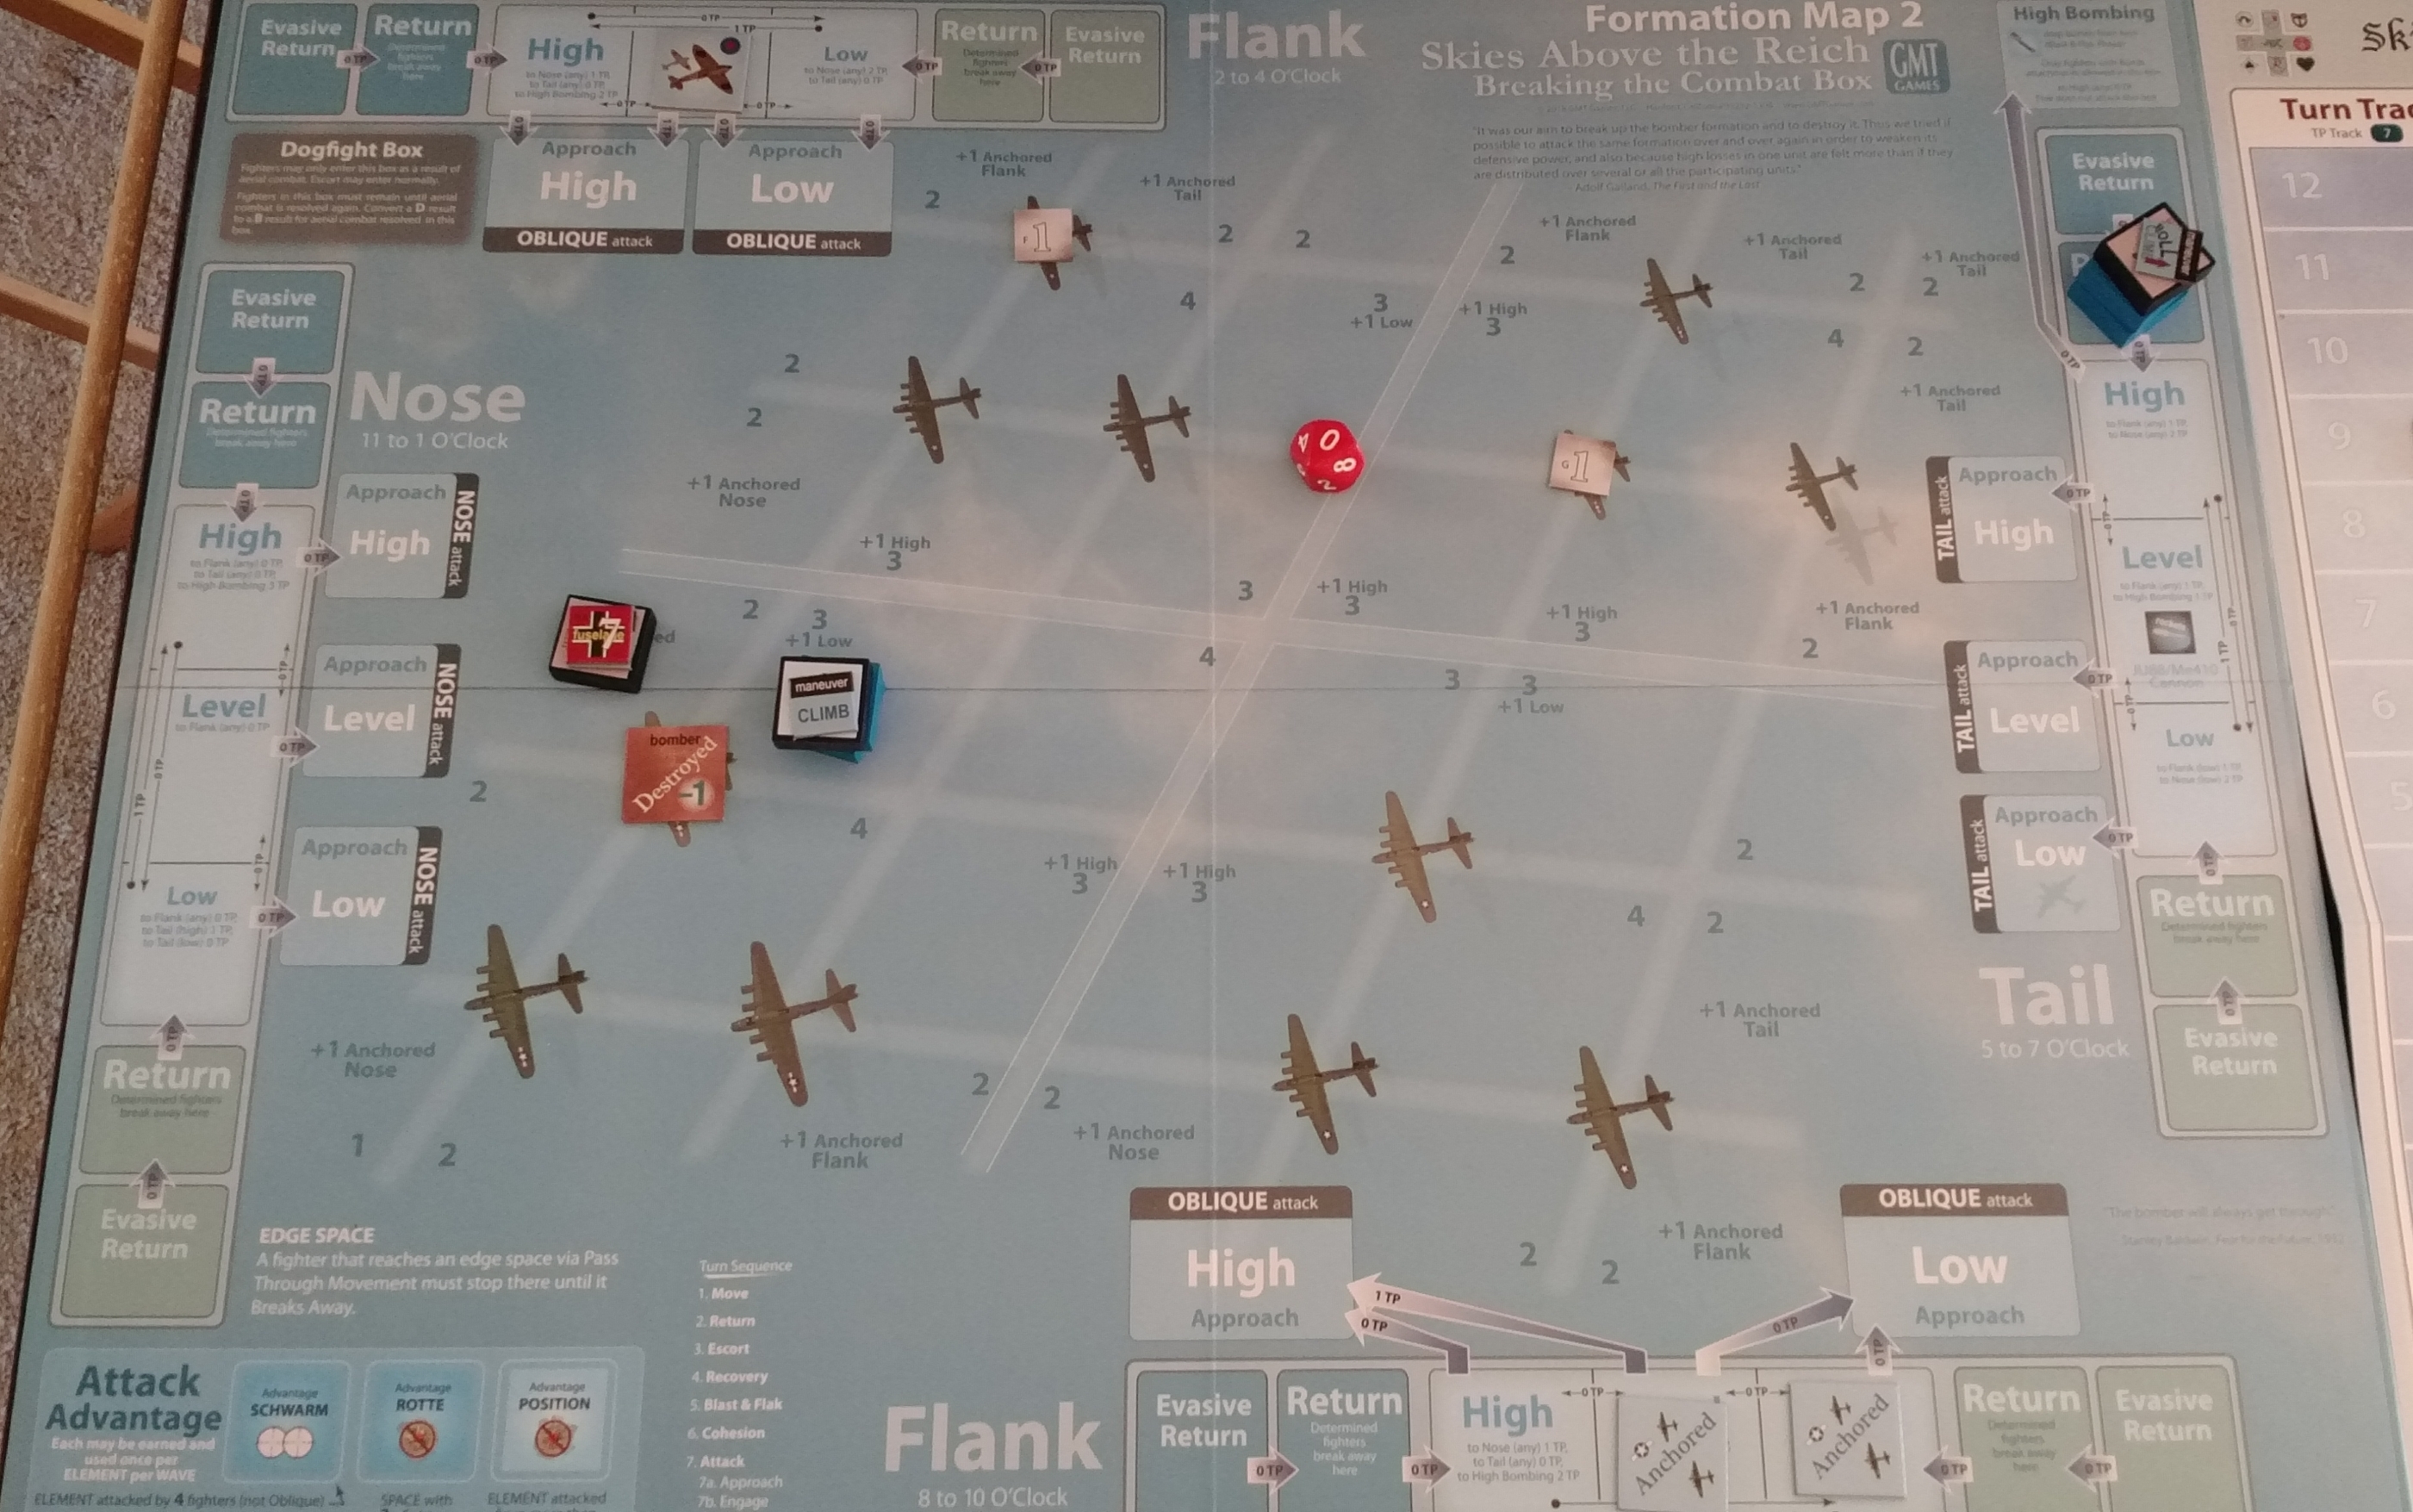
Dahl also pulls a hit to his fighter, with Pass Through 1. Unable to cancel this hit, I draw him a chit, which is Fuselage 7. Ouch. Continuing Fire yields nothing. Grimm goes to Nose Evasive Return, Dahl to Right Flank Return.
Turn 6
Frieling Returns to High Tail, Grimm moves to the regular Nose Return box. Dahl, during the Recovery phase, rolls a 2 (remember, to make a hit trivial, you have to roll under the number on the chit). So the hit is serious and he goes to the Fuselage Fate box for the remainder of the mission, trying to get home in a busted ship. One Spitfire moves to Tail Low.
Turn 7
Frieling expends 1TP to move to Left Flank High (since it’ll give a more favorable position than the Tail for attacking another bomber in that element, which they are going to do because the destroyed bomber lowers the LL for the whole element by 1. Grimm returns to Nose High. One spit moves to the Above Trailing station from Below Trailing.
Turn 8
Frieling moves Left Flank High Oblique approach, Grimm moves Nose High Approach. One Spit moves Tail High from Below Trailing. The fighters both move in on the lead bomber of the lead element, both going Determined, and both climb rolling to stay away from the Tail (since there are now two escorts back there, and they will be impossible to avoid). Grimm deals 1dmg to the fuselage of the bomber, gets a pass through and moves on. Frieling takes a hit (cockpit 5) and also passes through a bit. Grimm’s Continuing Fire card contains the “Pull Away” text, forcing him to draw another card and also apply that result. Fortunately it’s nothing. Frieling gets “Friendly Fire,” which is much better than it sounds, referring to friendly fire among the bombers. Roll a die, and an even result means the bomber takes a hit, which turns out to be another wing hit, for 3 dmg with no catastrophic result (alas).
Turn 9
The last turn of the mission, this is just mopping up at this point. Grimm returns Left Flank High, Frieling makes his recovery roll, meaning the hit was trivial (just a scratch!), and one escort moves to Above Trailing. That done, the fighters turn for home.
CUT TO
Meanwhile, Dahl has been nursing his fighter homeward. Just before he reaches the airfield, it gives out, and he crashes. HOWEVER, he manages to bail out, emerging from the ordeal unscathed and earning himself an experience point. Grimm, as the pilot who scored the staffel’s so-far sole victory, is showered in both champagne and also two experience points, bringing him up to 3. Two more and he can buy another experte skill.
So that was Mission 2. All in all, much better result than Mission 1, despite the deadlier map and my unknowingly hamstringing myself with the -3 OPs. There are four missions left in 1942. To “not lose” I need to score 4 more VPs. To win I need to score 14 more. Needless to say, a daunting prospect.
3 Likes
New mission report tomorrow. I will preview it by saying I have phenomenally bad luck.
2 Likes
Makes for an entertaining read, though… 
1 Like
MISSION 3
I will preface this by saying I intended to use this mission as a showcase for the advanced rules, which mainly govern the Pursuit phase which takes place at the end of a mission and deals with the fates of bombers which have fallen out of the formation during normal play. I hope it won’t be too much of a spoiler to say that it, uh, never came up. Maybe next time. For a visual aid, please refer to the first image in the thread, since I didn’t take any pictures this time. Whereas that mission was against “Formation B” on Map 1, this one is against “Formation A” on the same map.
Following the previous mission, the mood in the staffel was cautiously optimistic. When the alarm was raised and the eight pilots chosen for the mission made contact with the formation and saw that they would only have to deal with a single, isolated element, they were filled with Grimm Determination, by which I mean they were determined to repeat Grimm’s victory from the last mission and even build on it.
The formation was intercepted on its way to the target, meaning they hadn’t yet had the chance to drop their bombs and thus headquarters would look twice as favorably on their elimination as otherwise. Their (light) escort was with them from the beginning and would not abandon their charges, even unto the bitter end. Very well, the Spitfires had proven no deterrent last time, so there was no reason to suspect they would make things any more difficult this time around. The sun was in the rear of the formation, and by the time interception was accomplished the fighters had enough fuel for about six, uh…turns.
Turn 1
Auerbach and Bachmann, the Green replacements for dear departed Ademeit and Bauer (both lost, you will recall, to a fatal midair collision in Mission 1), swung around to the Nose, while Dahl, Frieling, Grimm and Heller (my three active experte, since Clade remains stuck in the infirmary, along with one previously-unused veteran) elected to come from the Tail of the formation, with Johann and Kremler moving in from the Left Flank and Right Flank respectively. A classic double pincer move, or anyway that was the intention. As per the rules, all entered in the Low box of their respective board sides.
During the Escort phase, one Forward escort moved to the Above Trailing station, and one Below Trailing escort moved to Tail Low, smack on top of my big stack of four fighters. This triggered aerial combat, which entails flipping over the escort marker to reveal how many fighters there are. In this case, four, so my four BF109s tangled with an equal number of Spits. Since the escorts moved from Below Trailing, my fighters were automatically “higher” than them, and since there was an equal number of both, my fighters did not outnumber, so rolling and cross referencing on the aerial combat table resulted in 1 escort downed (assigned, randomly, to Dahl, who now has two experience points after getting one for bailing out last mission) but also, somewhat catastrophically, in the remaining fighters and escorts exiting, “exit” being the term of art in SatR for being out of play, removed from game, etc. Nobody’s dead, but they are no longer participating in this mission because by the time they finished playing around with the escorts, the formation was out of sight.
So that’s half my force gone, on Turn 1.
Turn 2
Undeterred by the faithlessness of their comrades, Auerbach and Bachmann move to the Nose Low Approach box to begin their attack runs, with Johann likewise moving to Left Flank Low Approach and Kremler to Right Flank Low Approach. The pincer is now smaller, but will nevertheless proceed! The escorts do a little bit of shuffling from station to station but don’t bounce my fighters again.
All the fighters move in to attack the “trailing” bomber of the element, the bottom one which was (very slightly) damaged in the lead up to the mission and which I have chosen to label (going from the top down) “Bomber 4” in the misguided assumption that more than one bomber would be attacked in this mission. So Auerbach and Bachmann go to the “front” space, with the others approaching from either side. Three of the four pilots choose Determined as their mode (although Auerbach doesn’t have a choice, since his Green penalty is Zeal, which forces Determined; no evasion for this scion of the Fatherland!), but Kremler goes Evasive, since his approach from the right flank will put him in a Lethal Level 2 spot.
Since both Auerbach and Bachmann are in the same space, this triggers a collision check, which given the outcome the only other time i have done this makes my heart beat a bit faster, but I pull an “E 1TP” chit, which means I can either pay 1TP to have the fighter to whom I give the chit (my choice) go immediately to either Tail Return box or the fighter instead exits. Bachmann, as a Greenie, has the “Erratic” penalty, which means during the Break Away sub-phase of the Attack phase I have to pay 1TP or have him exit, and since I only rolled 2TP for this mission, I seriously consider having him exit now, but having already lost half my force to escort shenanigans, I want to at least get a burst out of him, so I send him to the high Tail Return box. Since he was Determined, the chit stays on the formation for purposes of Cohesion checks later on. For maneuvers, Auerbach roll climbs toward the Tail, Johann roll dives toward the Tail and Kremler dives toward the Left Flank (I am here hoping to set up a Position Advantage, which requires two different fighters to approach the same element from different positions and elevations, although the timing is not going to work out, since I forgot to take the “turn penalty” for Evasive into consideration).
Auerbach scores a minor hit to the bomber on his pass (1 dmg to fuselage), gets hit in turn (Cockpit 6), and the card triggers a collision check, which results in No Impact; pass through 1). Johann doesn’t hit or get hit but also triggers a (No Impact) collision check with pass through 1. Kremler simply gets pass through 1. During continuing fire, the only thing of note that happens is that Auerbach pulls the Friendly Fire text which results in a 1 dmg hit to the bomber’s wing from one of its buddies. Thanks, American gunner!
Turn 3
Bachmann and Johann return to Tail High and Kremler returns from Evasive Return to Regular Old Return on the Left Flank, spending that extra turn to come around for another pass that Evasive gets you. Meanwhile the escorts shuffle a bit more in their stations outside the formation and Auerbach decides that the hit to his cockpit was trivial, since it doesn’t appear to have punctured any vital machinery, including himself.
Turn 4
Bachmann and Johann move to Tail Approach High while Auerbach returns to Left Flank High and Kremler returns to Left Flank Low. Bachmann and Johann attack Bomber 4 from the rear, earning themselves the Out of the Sun advantage in the process, which enables avoidance of a hit. Both go in Determined. Since they’re in the same spot, I have to draw a collision check chit, which turns out to be a Proximity 2. Readers with a strong memory (or a strong facility with the scroll bar) will recall that it was just such a chit that I pulled way back in Mission 1 when I lost Ademeit and Bauer. They may also recall that if you roll at or above the number (2) on the chit, then no collision occurs. They may recall that I rolled a 1, then next rolled odd, meaning instead of colliding with the bomber, my fighter collided with another fighter, destroying them both. Well, surely that can’t are you kidding me, I rolled another 1, then odd. Bachmann and Johann go down in flames.
Oh. My. God.
Turn 5
Having witnessed the colossally unlucky loss of their buddies and feeling the hot breath of Time on their necks, since the mission clock is ticking down and nothing has as yet been accomplished, Auerbach and Kremler move in for the kill, to Left Flank Approach High and Left Flank Approach Low, respectively. The escorts continue to move around to little effect, with one going to the Tail High Return box this turn. The element fails its cohesion check (which I have been making each turn, but not commenting on when it changes nothing) and goes to Element Loose, lowering the Lethal Level by 1 in all spaces. Both fighters go in Determined.
Auerbach and Kremler both move to the Left Flank space of Bomber 4. Yes, I am once again tempting the extremely vindictive fate who controls collision checks. I draw an “E 2TP” chit, meaning pay 2TP or a fighter exits, and since I only have 1TP left I can’t pay, so Kremler exits the scene, offering Auerbach luck as he goes.
All alone in the world, Auerbach presses the attack, scoring a hit on the bomber (engine…0 dmg, ugh) and taking a hit in return (Rudder 7). He moves off to the high Return box on the Right Flank.
Turn 6
This turn marks the Flight Limit, but as Auerbach is the only fighter left on the board, the mission will immediately end if he leaves play anyway, which since he fails his Recovery check (meaning the rudder hit was serious) happens, as he shuffles off to the Rudder fate box.
FATE
The rudder hit is one of the more survivable ones, thankfully. A roll of 7 or higher means the pilot lands successfully. Unfortunately for Auerbach, I roll a 6, which means although he valiantly struggles to keep the aircraft’s nose pointed in the correct direction, he crashes. Not to worry, because most of the outcomes from a crash result in bailing out, almost all in fact, with about half of those resulting in the pilot being wounded. It’s only on a 1 that he fails to bail out. Of course I roll a 1 and he dies.
Post-Mission Analysis
Well, in the Notes field on the Staffel Log for Mission 1 I wrote “total disaster,” but I only lost two pilots on that mission, so since I lost three this time (two of which were replacement pilots and will thus not be, themselves, replaced) it seems appropriate to annotate this one as an “incredible disaster”. Although it is, of course, not the staffelkapitan’s fault, really, that his pilots can’t seem to stay in the air, it seems rather unlikely that headquarters will take such an expansive view of the situation, so this seems likely to be my only season in charge of this particular group. A rumor has been going around the barracks that our staffel is cursed, or maybe just that I am cursed, and I find it difficult to disagree.
2 Likes
Of course I roll a 1 and he dies.
I type this between giggles, but you may want to swap those dice for Game Science dice. I’ve had the odd GMT die be a bit of a stinker.
1 Like
I’ve been rolling the red die all this time, but they give you two, so maybe I should switch to black.
I’d salt water test them both.
1 Like
Huh, I’ve never heard of this before. I should try it!
Also try shooting the staffelkapitan. Pour encourager les autres.
2 Likes
The more you know…
…damn insomnia! Spent 30 min on some probably useless(?) research on how to make sure to find THAT die which never rolls a 1 in my pouch ;-/
2 Likes
Since this one was so quick to set up, play and tear down, I figured I would just write it up right now, while it’s fresh in my mind.
MISSION 4
First piece of business, Jachmann, welcome to the staffel. Please ignore the three miniature tombstones in the corner that your squadronmates keep throwing significant glances at, particularly the one marked with a J.
Now then, the mission particulars. Another on Map 1, Formation B. This is the “bombers all in a line” formation from the first mission. This time, however, the mission is Near Target, which means there will be flak to contend with for both the bombers and the fighters attacking them. Hopefully it won’t be too much of an issue. Four OPS are drawn, which means four fighters going up. Dahl, Frieling, Grimm and Heller get the nod. Clade remains (as far as the doctors will admit, anyway, and at this point we’re starting to wonder if Clade’s rich parents are slipping them some extra wheelbarrows of Reichsmarks) on the grounded list. This close to their target, there will be no fighter escort, which is good news.
I don’t know what the hell the fighters were doing prior to intercept, but at the time they reach the formation, the flight limit for the mission is only four turns, as short as it can possibly be. Even under ideal conditions, this means they will get two passes and two passes only against the formation (since turn 1 is always a bust and they’ll burn a turn returning from their first pass). I had hoped that the easy formation and lack of escort would make this one a (relative) turkey shoot, but the enormous time pressure means there is no possibility of screwing around. Get in, get some, get out.
Turn 1
All four fighters enter Tail Low. The tail is the best place to hit the bombers from, since the fighters can more or less try to match their speed and little to no deflection shooting is necessary. Unfortunately, the tail spot is also one of the best places to be hit from, and the low position (which the fighters are always forced into at the beginning), is one of the most dangerous. I had planned to move them all to Level, but the incredibly tight schedule they’ll have to keep means that goes by the wayside.
Turn 2
All four fighters move to Tail Approach Low. Before they have a chance to attack, a burst of flak hits the central bomber (Bomber 3, once again counting down from the top) with a nasty fuselage hit (3 dmg). Seeing this, Dahl and Frieling move to attack that bomber, while Grimm and Heller move against the low outside bomber, who doesn’t have anyone guarding her flank (Bomber 5). All fighters go Determined, as there is no time to mess around with Evasive Returns. All choose Climb for their maneuver, as the planned mission will be one pass from the tail on a climb, then turn around and one pass from the nose on a dive and hope for the best. At this point I am not very sanguine about our chances for scoring a kill.
However.
During burst, Dahl pulls an Engine hit on B3, with a high chance of catastrophic result, and for once the dice are in my favor and the bomber falls out of formation! Frieling still has to pull an attack card (because the bombers don’t just instantly vanish and all of this is supposed to be happening approximately simultaneously), and he takes a hit but uses the Rotte advantage they gained by attacking together to avoid it.
Meanwhile, Grimm scores a hit on B5 (wing 4) and in the process takes a hit himself (engine 9, yikes). Heller also scores a hit on B5 (engine 0, ugh, why are all the engine hits 0 dmg…probably because they can and often did come home on fewer than the full complement of engines, I guess), and also takes a hit in return (fuselage 4). Dahl and Frieling avoid all continuing fire, but Grimm pulls the Slow Climb text, which increases the lethal level for him by 2 if he was climbing (which he was), and as a result he takes another hit (fuselage 5) and immediately goes to the High Tail Return box. Heller also manages to get hit by continuing fire (wing 7) but continues his pass through the formation.
Turn 3
Dahl and Frieling return to Nose High. Meanwhile, Grimm shrugs off the fuselage hit, but the engine hit proves to be too much to remain in the fight, and he waves off for home. Heller’s fuselage hit is also serious, so he, too, leaves.
Turn 4
Dahl and Frieling move to pursue the fallen out bomber. Here’s what that looks like:

As there are no more fighters on the main board, the mission ends, but since I’m using the Advanced Rules, now we go to the Pursuit Phase. You can see on the turn 2 space a marker representing the fallen out bomber. All of the damage counters it took are under that marker. Up there on turn 4 (when they exited to pursue) are Dahl and Frieling. You count the number of spaces between (like, literally between) the fighter group attempting the intercept and the bomber they are attempting to intercept. In this case, it’s 1, and since you roll for equal to or higher than that number for intercept, in this case intercept is automatic. So, to the pursuit board!
Here’s what it looks like all set up. For the first pass, your fighters get to attack for free, but after that moving around costs TPs. I transferred all four of mine over from the turn track (since this is the only pursuit I’m going to get this mission I don’t have to be frugal with them), and I also got two extra from the one engine hit. You can see the damage counters distributed around the various spots. If the damage on any one of those spots ever exceeds the number printed on that spot, the bomber is destroyed. Since I got an engine hit before, there’s also a chance they might have bailed out before I even got to shoot at them, but it didn’t happen.
Both fighters choose to attack from the High Tail position, because that’s where the sun is, so they’ll get that hit-cancelling advantage for doing so. Also there’s no collision on the pursuit map (THANK GOD) so it seems like a win/win here. Dahl goes first and pulls a 4 dmg wing hit on the bomber. He also takes a hit, but cancels it with the Out of the Sun advantage. Once again the dice gods smile on me, and I roll a 10 on the table there for the wing, so the bomber catches fire and explodes. This is good for all the obvious reasons, but also because Dahl also got a No Ammo result on his card. I guess it was worth it! Dahl and Frieling turn for home, having done their bit for the staffel. And country, I guess.
FATE
Meanwhile, Grimm’s engine coughs, splutters and gives out just as he’s coming in for a landing, one of the most dangerous times to have something like that happen, sooooo…he dies. Friendship ended with Grimm, now Dahl is my best friend.
Heller’s ship catches fire and he burns to death. We hardly knew ye.
So that’s Mission 4. Two missions left and three VP away from Not Losing, so we’ll see how it goes. I like the pursuit board, adds some more flavor into this already extremely flavorful game. It turns out being a fighter pilot in WW2 was kind of dangerous. Jachmann pauses while polishing his boots to watch the morale officer wheel in another pair of miniature tombstones.
2 Likes
Meanwhile, Grimm’s engine coughs, splutters and gives out just as he’s coming in for a landing, one of the most dangerous times to have something like that happen, sooooo…he dies. Friendship ended with Grimm, now Dahl is my best friend.
Heller’s ship catches fire and he burns to death. We hardly knew ye.
The staffelkapitan is going to have to be Oberstleutenant Steal Yo Parachute to prevent pilots bailing out early in future…
The “parachutes” are actually just packed with popup cardboard cut outs of Hitler looking disappointed, known colloquially around the staffel as “Frowning Führers”.
1 Like
The sheer terror of getting into a close pass with a 109 and seeing Hitler peering at you over the shoulder of the Luftwaffe pilot…
1 Like
Have you tried either of Jerry White’s previous designs?
Enemy Coast Ahead: The Dambuster Raid
Enemy Coast Ahead: The Doolittle Raid
Gene Billingsley (head of GMT) thinks very highly of the work Jerry has done for them. His next game, Atlantic Chase, is pretty unique as well.
I had never heard of him or them until this game. I only got in on the very tail end of the P500 for SatR thanks to an offhand post in a gigantic wargames thread by someone over at Quarter to Three. Jerry says they’re probably going to fire up a P500 in August for an expandalone for SatR dealing with Fw-190s and B-24s, which I will 100% get in on.
MISSION 5
Another no-escort, near target, 4 OP mission on Map 1, Formation A this time (same as Mission 3). This time out, the sun’s on the Right Flank, the formation suffered no damage on its trip from sunny England to our shores, and the flight limit is a respectable 6 turns. Four fighters enter the fray: our (current) hero Dahl, his long-time companion Frieling, and newcomers Richter and Zweigart, who if they aren’t experten at least have the virtue of not being Green. The real bummer this time is only 1 TP, which is going to be a severe constraint on the ability to pursue fallen out bombers.
You know, if there are any.
Turn 1
All enter Tail Low. The bottom bomber in the formation (B4 from here on out), suffers a flak hit, and one engine starts trailing a little smoke, but otherwise it appears unphased.
Turn 2
All move to Tail Approach Low then sweep in to attack the element, Dahl and Richter going for B4 and Frieling and Zweigart for B1 (the top bomber in the element). All go determined. Yes, once again we brave the capricious gods of the dreaded collision check.
The pair of Dahl and Richter do in fact draw a “hit” chit on their collision check. The rules just say “put it on one of the fighters” but don’t say how to apportion the hits, so I randomly determine that Richter gets it. The fighters earn both the Rotte and Schwarm advantages because there are so many of them, they came from the same place and are all determined. A (very) brief aside on rotte and scwarm here.
During their pass on B4, Dahl takes a hit but cancels it by expending the element’s Rotte advantage. In return, he pulls another engine hit on the bomber, then presses his luck by expending the two hits the Schwarm advantage allows to score two separate 2dmg hits to the wing of the aircraft, and then expends his timing experten skill to score yet another wing hit, this time for 3dmg. The bomber is looking pretty beat up when Richter scores a 1dmg hit to the fuselage, and gets the “riding the tail” result, which forces you to either break away to the Tail Level box immediately or draw another attack. Well, since the bomber is so close to downed, he chances it and draws a hit for himself (Fuselage 2) but also one for the bomber (also Fuselage 2), which is enough for it to catch fire and break up. Turn 1 and already one bomber down!
Things don’t go quite as well for Frieling and Zweigart. Frieling takes an engine (8) hit, and Zweigart gets an engine hit on the bomber but in return takes an Elevator 7 hit. Ouch. Continuing fire sees Dahl take a (3) hit to the engine and Zweigart, caught by the “Slow Climb” result, is forced to break away to the Tail High Return box while the others break for the flanks, Dahl and Richter roll climbing/diving, respectively to the Left Flank while Frieling rolls high Right Flank.
Turn 3
During the Recovery phase, Dahl (maintaining his “best friend” status) determines that his hit was trivial, while the others’ hits were all serious, so off they go to their respective Fate boxes. Bomber 2 takes a bad wing hit from the flak and falls out of the formation, which subsequently fails its cohesion check and becomes loose.
Turn 4
Dahl returns to Left Flank High and notices the bomber leaving the formation. Ack ack scores a fairly trivial wing hit on Bomber 1.
Turn 5
Dahl moves to intercept (automatic) the fallen out bomber.
Pursuit
Sun is in the High Nose position, so Dahl moves there for the first pass against the bomber and goes determined. His first pass against the bomber results in no hits on either side, so he swings around for another. This is where the 1TP bites me in the ass, since TP is crucial for doing anything in the Pursuit phase. It’s enough for one more pass from the Tail Level position, but that also results in nothing, and with all TP expended Dahl is bingo fuel and turns for home, shaking his fist at the bomber as it escapes under the baleful glare of Dahl’s Frowning Fuhrer.
FATE
In an incredible twist of chance, Richter and Zweigart manage to land their aircraft and garner one shiny experience point each. Frieling, my last remaining unwounded experte aside from Dahl, then, predictably dies in the most dramatic fashion possible as his stricken aircraft just straight up explodes. Sigh.
Meanwhile
Jachmann plays his forty-fifth game of solitaire since joining the staffel. He loses.
Only one more mission in 1942 to go! If you’ve been keeping score, stop reading. If you haven’t been keeping score, then you won’t know until I tell you that I need two more VPs to fail to lose this season, which failure to lose would enable me to convert to a longer game and continue with this by now quite moth-eaten staffel. Since there’s only one mission left, if it turns out to be Inbound I’ll need to score one bomber kill, something that seemed quite daunting a couple of missions ago but very doable now, but if it’s either of the other two mission types, I’ll need two, something I haven’t managed yet. Will we get there?! Tune in next Monday to find out!
3 Likes
Frieling, my last remaining unwounded experte aside from Dahl, then, predictably dies in the most dramatic fashion possible as his stricken aircraft just straight up explodes.
Perfect.